Thursday, May 30, 2013

May Tri-Polish Challenge: Day 4

The final day of May's Tri-Polish Challenge has arrived! This month's Tri-Polish colors are blue, grey, and red. My polish choices for the month are Sinful Shine Break Away, Sinful Shine Devious, and China Glaze Elephant Walk. The requirements for this challenge from Crumpet's Nail Tarts are as follows:
  • Three colors are specified for each month, for use in four manicures, and the participant must choose a single polish for each color to use throughout the four manicures.
  • All four manicures must use at least two of the three polishes, and at least one mani must contain all three.
  • The only other colors which can be used are white, black, gold, silver, or a clear-based glitter.
  • Manicures are to be posted the Tuesday and Thursday of the last two weeks of the month.
I tend to use all three of the polishes on most of my manicures for this challenge, but today's only used Devious and Break Away. 


I started with three coats of Sinful Colors All About You, then one finger at a time I put a thick coat of Devious (except for the ring fingers, which of course used Break Away) and then daubed it off with some crinkled plastic wrap. 


Usually I prefer to take pictures of my manicures in natural light, but I had to use flash to even get a glimpse of how the gold really shines on these nails. It looks like gold foil! Even with that, these pictures really don't capture it in the slightest, but I'm just not a good enough photographer to know what I need to do to show it off better.


 I have to say, though, this was the worst manicure for clean-up ever. Even water marbling is easier to do clean-up on than glitter with this red. Devious has a consistency of a really thick jelly, and when you try to do clean-up on it, it's like trying to get blood out of cloth: it gets lighter and lighter but it's visibly still there. Add the stubbornness of the random fleck of glitter here and there and honestly? I gave up on clean-up well before I was satisfied. It was that annoying. :P But look at the pretties! Sooo worth it!


Now let's see the last batch of beauties that we all came up with for red, blue, and grey this month!

Wednesday, May 29, 2013

May Tri-Polish Challenge: Day 3

Sorry I'm a day late on this. Memorial Day has my internal schedule screwed up - not to mention that Monday night, my son decided to stick little beads in his ears and pretend they were earplugs. I got one out, but an emergency room visit was needed for the other one. They couldn't get it out without worry about damaging his ear, so they sent me to an ENT specialist with him yesterday, which meant I completely forgot this had to be posted. They put him under full anesthesia this morning and pulled that silly thing out with no damage, and I finally remember this post today at lunch! Better late than never, I suppose...

This month's Tri-Polish colors are blue, grey, and red. My polish choices for the month are Sinful Shine Break Away, Sinful Shine Devious, and China Glaze Elephant Walk. I went with a simple dotticure in a starburst pattern - Devious on one hand, Break Away on the other, alternating on the ring fingers for an accent nail. Three sizes of dotting tool were used for this pattern.


Now let's see if the other ladies in the challenge were more inspired than I was today! :)

Saturday, May 25, 2013

52-Week Challenge: 5/20 - Pastel

This week's theme from the 52-week challenge I've been (mostly) following is pastel. So I used a pale pink, a baby blue, a light green, and white to make this pretty floral panorama on my nails.


I started with a base of two coats of Nailtiques St. Croix, though these pictures make it look kind of lavendar rather than the milky pink it really is. I used Sinful Colors Snow Me White to brush a broad french tip on each nail, and then Avon Vintage Blue and a detail brush made up flowers of various sizes. I used more Snow Me White to draw in the details on the flowers (and in a few cases, blue again and white again on top of that), and then China Glaze Tree Hugger to draw in the vines and occasional leaf.


My nails are just about the only part of me that gets much of a chance to be delicate or girly, since I've been a tomboy since I was old enough to climb trees. I don't really care for lace, hardly wear the jewelry I own, and I couldn't keep a flowering plant alive to save my own life, so I have to make do with flowers on my fingers!


Thursday, May 23, 2013

May Tri-Polish Challenge: Day 2

This month's Tri-Polish colors are blue, grey, and red. My polish choices for the month are Sinful Shine Break Away, Sinful Shine Devious, and China Glaze Elephant Walk.

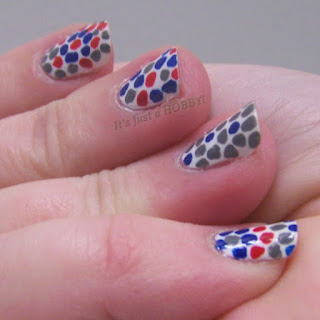
For this manicure, I also used Sinful Shine Wisp for the base color. For most of the nails, there is absolutely no pattern in the mosaic shapes I used. I did the colors pretty much randomly, though I occasionally did little paths of one color or other. The ring fingers, of course, are obviously mostly grey with only a few spots of color - red on one hand and blue on the other.


I have to admit, I LOVE dotticures! They're so much fun to do and to see. On my right hand, I did do a bit of a pattern on a few of the fingers, just out of boredom. My index finger started with a red center stone, surrounded by blue stones, and then surrounded by an alternating red and grey ring. My pinkie finger was done in concentric colors starting with the grey stone down near the base of the nail.


And now for something completely different! Everyone else's various ways of using the same three colors to make amazingly different manicures!

Tuesday, May 21, 2013

May Tri-Polish Challenge: Day 1

This month's Tri-Polish colors are blue, grey, and red. My polish choices for the month are Sinful Shine Break Away, Sinful Shine Devious, and China Glaze Elephant Walk.

For this manicure I also used Sinful Shine Wisp for the base.


I mixed Wisp and Break Away in varying amounts to sponge on the gradient from white to blue, then used Elephant Walk to draw branches, and Wisp and Devious to dot the flowers. I originally expected everything to show up better on the nails where the blue was at the bottom, but it turned out that the grey branches hardly showed up on those, so only the ones with the white bottoms actually looked like trees, leaving most of the nails to seem very abstract. Which isn't a bad thing, of course, as they were pretty all the same, but the ring fingers are more of the actual look I was going for.


The thumbnails I actually did intend to be rather abstract. I did larger flowers with more mixing of the red and white, and no branches at all.


All in all, I liked the way my flowering trees came out, and very much enjoyed wearing them. I didn't want to remove them to do the next manicure!!


Let's see what every one else has done with their blue, red, and grey!

Monday, May 20, 2013

MSMD - Art Deco

It's Monkey See, Monkey Do Monday again here at my hobby space, and this week I'm mimicking the always amazing pshiiit.


As usual, my rendition is nowhere near as good as hers, but I still enjoyed having it on my nails for a while. I used NYC Purple Pizzazz Frost, Avon Mirror Shine Polish, and Rimmel London I Lilac You for the three main colors, and China Glaze Black Diamond for the black outlines. My ring finger and thumb also have Sinful Colors Daddy's Girl over the Purple Pizzazz Frost, though it's a very subtle difference, and the camera didn't capture it at all.


I just wish I could make straighter outlines. I get so tired of the little wigglies. ^_^


Thursday, May 9, 2013

Framed Leaves

When my friend V wants to come over and do her nails, but doesn't know what she wants done on them, we usually head to my Nail Art pinterest board and she'll pick out a handful that jump out at her for me to choose between for which one or ones I feel like doing that day. Usually we'll use that picture as an idea or place to start, but we seldom actually mimic them closely. I do that often for my manicures, but V usually has an idea where she wants "this, but with this, or that, or changed this way..." However, she loved this nail art so much, and the colors, that she wanted it just like this one. Or, you know, as close as I can come with my growing abilities. :)

So here is the nail art which she loved so much, from Finger Food Nails:


However, given the length of her various nails, we decided to put the accents on her index and thumb rather than ring finger.

I discovered first that drawing a border on nails? WAY harder than it looks! We didn't take pictures of her right hand because I did that one first, and her left hand, which I did second, came out so much better. I apologize for the tip wear - it was raining the day we did the manicure, and I no longer take pictures inside my house because the lighting is horrible, so the pictures were taken after a day of hard work at the office! I would make it more of a priority to make a light box if it weren't that the lighting in my office at work is actually pretty good, so when I can't take pictures outside, I just do it on my lunch hour, but V works on the other side of campus from me. A bit inconvenient for her to come over for pictures at lunch! :)


We used KleanColor Military Green for all the green nails and the framing and outlining, and the white base for the accent nails was my new go-to white, Sinful Shine Wisp. I used China Glaze Solar Power (I think I did, anyway; I failed to record which colors I used, but I'm sure of all the others besides the base yellow) to fill in the leaves, and topped them with a thin swipe of Sinful Colors This Is It for that nice shimmer.


As seems to often be my problem, I go too big. I don't leave enough white space (literally white in this case, but it means the empty background space in an image) when I'm creating a manicure. These would have been better if done with my thinnest detail brush (I have one that I have cut down to only about three or four bristles) and smaller leaves, more spread out. I really like how delicate the leaves were in FingerFood's manicure, but that's an area where I continually strive for improvement. I've been doing this nail art hobby of mine for nearly a year and a half now (I did my first ever nail art on the Winter Solstice of 2011) and I've come a long way, but I've got a long way to go to what I'd like to be. But since it really is still just a hobby, and not an obsession, I don't actually spend a lot of time practising any of this stuff. I just like to do my nails. I'd get better at it faster, I'm sure, if I put the time and effort into practising my manicure designs on my swatching wheels until I'm completely happy with them before putting them on my fingers, but I usually just jump right into it! Which keeps it fun, but makes me glare when I post these close up pictures on a blog. 

Still, it's a good record, and (I hope) inspiration to others out there who are having fun with it but not nearly as good as some of the amazing artists out there. If you look at too many of them, you can despair sometimes when you see your own work on your own hands. But having a record of my progress lets me and, I hope, others see just how far I've come over time. And if I can do it, anybody can do it!

Tuesday, May 7, 2013

May Polish Days - The Number 5

THE NUMBER 5!

The theme for May's Polish Days is, as you can see, the number 5. Any interpretation of 5, so I'm really looking forward to seeing what everyone else comes up with! Being who I am, my mind immediately went to the five elements: earth, water, air, fire, and spirit. 


The fire element is on my index finger, with a base color of Ulta Eye Popping Poppy. Air is in the middle on top of Sinful Colors Unicorn. For Water on the ring finger I used Avon Vintage Blue, and Earth was done with Avon Jade on the pinky finger. For Spirit I used a base coat of Sinful Shine Wisp and a single coat the indie polish Wonder Beauty Diamond Dust to highlight the airy, ethereal nature of one's Spirit. All of the symbols were done in Sinful Shine Dark Room on a layer of top coat on a piece of plastic, then cut out and transferred to my nails after they were dry.


For the other hand I used the same base colors, and then drew a star on each finger. The five points of the star, in paganism, also represents the same five elements, so I thought that tied the two hands together nicely without me having to do the same intricate symbols twice. I'm so lazy! I used Dark Room to draw most of the stars, though I drew one of them in Wisp for an accent, then topped all five of them with Sinful Colors This Is It. I honestly wasn't careful about putting This Is It on any of the stars - they all went over, but it only really showed on top of Wisp. They look actually outlined in the black ones, but it just ended up looking messy on the white one. Ah well, we learn something new from each manicure, yes?


This picture is slightly blurry and it really shows how beautifully the Diamond Dust shimmers on my thumbs. I don't remember whether I purchased my mini bottle of Diamond Dust or if someone gave it to me, but I wish I could find for sure where I got it so I could purchase a larger bottle. It's been a go-to polish when I want to just add sparkle to any polish without affecting the color. But while my stash list has it labeled as a Wonder Beauty polish, the only label actually on the bottle is "Diamond Dust" (hand written, round label, on a mini bottle), I've never purchased anything else from Wonder Beauty, but I can't find it on their website or on the other company I might have gotten it from, Spooky Bones (Strange Polish). So if anyone knows who made/makes Diamond Dust, I'd love to know. I need more. :)


In general, it's not one of my manicures that are just pretty on their own, but I'm really happy with both the symbolism and the rendition of this month's theme.


Now it's time to check out what the others came up with for "the number 5"!

Monday, May 6, 2013

MSMD & 52-Week Challenge: 5/6 - Yellow

Today's post is both a Monkey See Monkey Do Monday and it uses this week's challenge theme of 'yellow'.

I was inspired by this manicure from Emily's Nail Files:


Aren't those daisies adorable? I started with a base of Rimmel London's I Lilac You, and then dotted my little flowers with white...but then I decided they'd look better with a black center than yellow, after which I thought the petals should be yellow, which turned them into Black Eyed Susans! :)


The black centers are NYC Black Lace Creme, and the yellow was done with Sally Girl Banana.


Now let's see what other bloggers might have done for today's Monkey See Monkey Do Monday!

Friday, May 3, 2013

52-Week Challenge: 4/29 - Inspired by Food

Strawberries! Let's face it - I don't really get inspired by food. No matter how many artists have been moved to paint still life portraits of bowls of fruit, that isn't me. So I typed 'food nail art' into google, clicked 'images', and browsed. Still really not inspired, but I think the strawberries are cute, so strawberries it is! :)


I started with a base of my brand new white, Sinful Shine Wisp. I used Color Club Take Me To Your Chateau and sponged some on the top half of the nail, because I didn't want that stark white as contrast. The base color for the strawberries is Sinful Shine Devious, and then I used China Glaze Adventure Red-Y and Solar Power for the seeds; OPI Jade is the New Black and China Glaze Tree Hugger made the stems.


I was told this morning that they're "cute" and one person said they looked tasty! To which I replied, "No nibblin' on the nails!"