Showing posts with label Rimmel. Show all posts

Wednesday, May 28, 2014

Flying Purple People Eaters

This manicure was inspired by these gorgeous nails done by Nuthin' But a Nail Thing.


I was just feeling very purple and so I skimmed through my Pinterest inspiration board and picked something I could do in all purple.


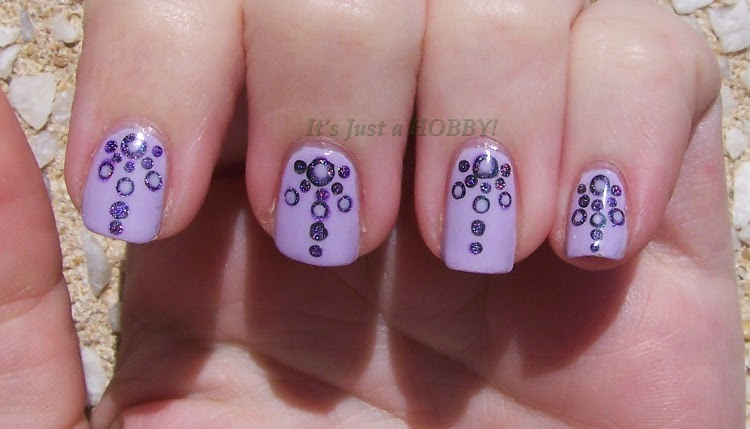
The base color is Rimmel I Lilac You, and the dots were done in NYC Midnight with Nabi Hologram Dark Purple on top of them. I think I used three different sizes of dotting tools for this baby!


Friday, February 14, 2014

Hearts Two Ewes

I don't actually celebrate Valentine's Day (I'd rather have flowers in a random day in March than on a specific day because everybody else is doing it) but for my co-workers' enjoyment, mainly, I do actually have hearts on my fingernails. That and I just really love the two red glitters I used!

I apologize for the quality, or lack thereof, of the pictures in this post. I just could not for the life of me get these nails to photograph well. I took a couple dozen pictures, like normal, and that normally gives me about 6-8 decent pics, but this manicure? Zero decent pics. Here are two of the best...


The base color is Rimmel London Burgundy Flirt. The hearts are outlined with Milani Whitest White. The glitter used on the index and middle fingers is Cherimoya Love Potion #Mine and on the ring and pinkie finger is Blackheart Beautiful Revenge. I love their glitters and the skull-shaped bottles don't hurt! They're adorable. ^_^


I hope everyone has a fabulous Friday, whether you like the commercial holiday or not. :)

Wednesday, October 16, 2013

My BEST Nail Art EVER!

With a post title like that, I have to give you a picture of the finished manicure first, before I discuss anything else, just to prove I'm not exaggerating!


I really do think this is my best nail art I have ever done, in the nearly two years I've had this hobby. It looked for all the world like decals, or store bought nail polish strips, it was so amazing! I couldn't believe I had done this!

As for how I got there, well, I read a lot of blogs. Seriously, I have 378 blogs in my feedly under the category "Nails". Of those, only TWELVE blogs are also in the category "Art". These are the people who do actual artwork on the tiny canvases of fingernails. Of those, most of them use acrylic paints to do the artwork. I still absolutely adore admiring their artistry; however, I have no hope of recreating those manis on my own nails because I stick just to nail polish. There are a few of them, though, that do amazing, amazing! things with lacquer. Base Coat Top Coat is one of those peeps. Her gemstone series just blows me away. If you've never gone to check out her blog, I highly recommend setting aside a few hours to go through the archive. It's amazeballs, really. She also does amazing tutorials, but this is the first time I've attempted one.

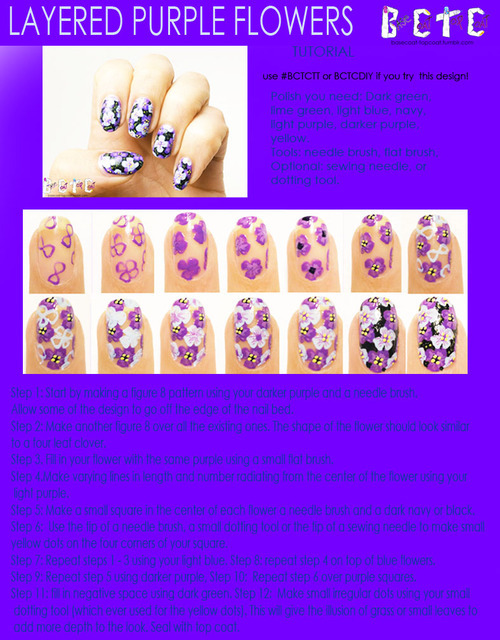
I was trying to figure out what I wanted to do on my nails, and since I was on the phone with my bestest bud V already, I asked her to just pick a color. It gave me a place to start. She said purple, so I scanned through my nail art pinterest board (where I pin the manicures I might want to try someday, along with some that just make me go WOW even though I know I can't ever do them) and this tutorial for "layered purple flowers" from BCTC hit me. I was fairly sure it was going to come out crappy - it tells you to do the flowers first and then fill in the background, and I was certain I was going to screw that up - but I wanted to give it a shot anyway.


I started with Wet N Wild Who is Ultra Violet? for the "dark" purple and Rimmel I Lilac You for the light. Sinful Shine Dark Room is used for all the black and Milani Whitest White for all the white sections, and Sally Girl Banana was used for the tiny yellow dots.


I followed this tutorial to the T as best I could (although on my dominant hand, I didn't make the figure eights; I just used a wider brush to splotch the petals on and the results came out pretty similar) and my results, I think, speak for themselves. (Which doesn't seem to stop me from babbling, of course.)


I kept this on my hands for an unprecedented entire week, because I couldn't bear to take it off. I was seriously getting the urge to paint new designs at least two days before I gave in and hit the acetone. I can't pick and choose the best pictures for this one, so I'll just put the picture spam below a cut for faster loading time.

Tuesday, September 3, 2013

Quilted Rainbow

One of my co-workers is a quilting fanatic. I could almost say she makes more quilts than I do manicures, but since it only takes me a few hours to do a manicure, that would be a bit of an exaggeration. :) I've been trying to think of a way to do quilt blocks on my nails for ages, especially since she occasionally looks at my nails and says, "Oooh that looks like a quilt!" Well, here are my quilt block nails for LL!


Each nail has two colors on it, done with the plastic wrap technique. The thumb has China Glaze Innocence and Cranberry Splash. Index finger has Sinful Colors Unicorn and Orange Cream. The middle finger is Wet N Wild Stand the Test of Lime and Zoya Logan. The ring pinwheels have a base of Sinful Colors Cinderella and Neptune, while the pinky fingers have Rimmel I Lilac You and the sparkly lavender end of Revlon Moonstruck. I used Sinful Shine Dark Room along with a little polish thinner to draw the lines and blocks with a tiiiiny nail art brush, and voila! Quilt blocks on my nails!

And now for the picture spam!


Monday, May 20, 2013

MSMD - Art Deco

It's Monkey See, Monkey Do Monday again here at my hobby space, and this week I'm mimicking the always amazing pshiiit.


As usual, my rendition is nowhere near as good as hers, but I still enjoyed having it on my nails for a while. I used NYC Purple Pizzazz Frost, Avon Mirror Shine Polish, and Rimmel London I Lilac You for the three main colors, and China Glaze Black Diamond for the black outlines. My ring finger and thumb also have Sinful Colors Daddy's Girl over the Purple Pizzazz Frost, though it's a very subtle difference, and the camera didn't capture it at all.


I just wish I could make straighter outlines. I get so tired of the little wigglies. ^_^


Monday, May 6, 2013

MSMD & 52-Week Challenge: 5/6 - Yellow

Today's post is both a Monkey See Monkey Do Monday and it uses this week's challenge theme of 'yellow'.

I was inspired by this manicure from Emily's Nail Files:


Aren't those daisies adorable? I started with a base of Rimmel London's I Lilac You, and then dotted my little flowers with white...but then I decided they'd look better with a black center than yellow, after which I thought the petals should be yellow, which turned them into Black Eyed Susans! :)


The black centers are NYC Black Lace Creme, and the yellow was done with Sally Girl Banana.


Now let's see what other bloggers might have done for today's Monkey See Monkey Do Monday!

Tuesday, April 9, 2013

April Polish Days - 7 Deadly Sins

"Lust, Gluttony, Greed, Sloth, Wrath, Envy, Pride. Unless you're a saint there's a chance you're guilty of at least one.  I'm leaving this one up to your imagination though, so however you chose to interpret the theme, it's up to you! Afterall, who am I to judge your sins ;)"

It's Polish Days again, and as you can see, this month's theme is the 7 Deadly Sins. It was hard for me to take this one seriously, though, because I'm not a Christian. As a pagan, I believe that while emotions can sometimes lead to evil actions, it's not the emotions that are the evil. Your emotions hurt only yourself - only your actions can hurt others.

So here's my interpretation of two of the "deadly sins".


There's Pride and the Grapes of Wrath for you. :) I started with a base of Rimmel London's Sage All the Rage, which is such a pretty shade of dusky light green on its own, but when I put these bright colors on top of it, it washed out to nearly gray. The colors used in the rainbow, in order, were: China Glaze Salsa, Wet N Wild Sunny Side Up, China Glaze Solar Power, OPI Jade is the New Black, China Glaze Man Hunt, NYC Purple Pizzazz Frost, and Sinful Colors Snow Me White.

For the grapes I started with a dotting tool and Rimmel London I Lilac You. I then dotted Purple Pizzazz Frost on top with a slightly smaller dotting tool, and then used a detail brush to make light reflection curves with I Lilac You. Jade is the New Black made the leaves, and a good coat of Seche Vite tops it all off. I was really happy with the way the grapes came out - they look almost like decals sometimes when I look at them! :)


Check out all these other interpretations of 7 Deadly Sins today!


Friday, July 13, 2012

Week 28: Gradient

Welcome to my little corner of hobbyland. As you probably know, I'm following a Year's Challenge that I found over on the blog I'm Still Thinking... This week's theme is Gradient, so I asked my visiting daughter what color I should use. She said red, so red it is!


I started with a base white coat so the colors would cover better, then I put a drop each of China Glaze Brownstone, Rimmel Burgundy Flirt, and Avon Ruby Slipper next to each other on my paint palette (otherwise known as the plastic lid I stole out of the kitchen ages ago and won't give back. ;) Using a fan brush, I picked up all three colors together, and painted them across my nail as one. If you use a few strokes, it blends them together seamlessly. It's my favorite method for making gradients, because the obvious lines between colors that even sponging gives you kind of irks me. Not that sponging doesn't have its place, and it looks fabulous on other people, but on my own nails, I will overdo it to the point of obsession trying to make the change gradual. So even though it's messier, I will use a fan brush almost every time. :)


Of course, I obviously didn't leave it there! I used a striping brush and Sinful Colors All About You to add some curving stripes, and then added a rhinestone in the middle. Neither the Gryffindor look nor the fact that it looks kind of like a wrapped present were intentional! As you can see, I didn't get the pictures taken until after I'd started to have some tip wear, but I have to admit that sometimes I'm just plain lazy! I also don't have good clean-up on these because 1) I'm out of acetone, and 2) cleaning up red even with acetone is a job and a half, and I just couldn't get it done well with polish remover! And I may love sharing my nail art fabs and flops with you guys, but I just didn't feel like spending an hour cleaning up a manicure that only took a half-hour to put on in the first place, when it really only looked bad in the close up pictures. ;P

Monday, June 25, 2012

MSMD Monday Mani

This is the latest picture to be added to be Pinterest nail art board, and so when I was trying to figure out what to do with my nails this time around, I decided I could make a rendition of this. I had to leave out certain elements because my nails are just not this long, so if I added glitter and rhinestones it would be way too busy! :)


I also just got a new polish in the mail, Rimmel Burgundy Flirt, and I thought it would be interesting to use it for this. I hardly ever have red nails! Please forgive the condition of my cuticles - my poor hands have been having a rough week! And I'm out of the Jack Black lotion I had. See me pout. :(


So after a base of my first Rimmel polish ever, I used striping tape to block off two lines, and put China Glaze Liquid Leather over the bottom portion, and Sex on the Beach for the center pink stripe. I also put Liquid Leather on the bottom half of my accent nail. I put one coat of Max Factor Fantasy Fire over the Liquid Leather, and across the entire accent nail. The diagonal line where the base color changes from burgundy to black on my accent nails is a lot more prominent in real life, but the entire manicure is such a dark color, I really couldn't capture it on the camera. I used Sinful Colors Secret Admirer to stripe both sides of the pink area, and then used a detail brush to draw the spirals.

I might have had better pictures if the sun had been shining the day I did these, but the outdoor pictures still came out clearer than the indoor lighting.


I also had a bit of a problem with a nail lately. The severe flaking that was in the middle of my nails when I used the Nail Life base coat have now grown out past my nail beds. This is why both of my thumbnails are so short - they both broke off nearly as soon as the weak spot grew out. This time, however, I was having problems with the middle nail on my right hand. First the squoval corner broke off, so I rounded the end. Then I got a crack across the end, but it didn't quite break. So I used the tea bag method for the first time to patch it so it would stay the same length as the rest of my nails...but for some reason something about what I did made the shape of my nail...well, obviously I don't think my nail actually changed shape, but the appearance of it changed. I have no idea why, though I'll probably figure it out some time over the next few weeks with changing manis.