Thursday, October 31, 2013

Creepy Claws

For my last Halloween post of the season, you get the only "scary" type of manicure I did this year. My six-year-old son, J, is dressed as a werewolf for trick-or-treating tonight. I was all about the bargain hunting for costumes this year (I pieced together B's Equestria Girls Fluttershy costume from eBay and thrift stores!) so while we found a really great werewolf costume from Wally World for just 15 bucks, it did not come with claw gloves. The cheapest gloves I could find anywhere would have been 20, which doubled the cost of the costume. I didn't feel like going there. So instead, I bought a pair of 5-dollar gloves, cut the tips off of ten swatch sticks, and let the nail artist go wild.


I just tried to make the nails look like animal claws, and then J decided he wanted blood on them. I thought blood on *all* the nails would be excessive, so I put blood on the index and middle fingers, with some splatter on the thumbnails.


I used probably five or six different polishes to make these claws, and I can't remember which ones they were. Sorry about that. But the blood was done with Sinful Colors Beau Brique.


Pumpkination

For my last Halloween manicure, we have pumpkins and Jack-O-Lanterns!


I was attempting to make one happy and one "grrr" Jack, but the "grrr" one came out more pouty/sad than scary! I used both Wet N Wild The Clock Strikes Orange and Sunny Side Up to make the color for the pumpkins. The brown lines, stem and vines, were done with China Glaze Brownstone, and the vines and stems were highlighted with Sinful Colors San Francisco and Exotic Green. I used China Glaze Liquid Leather for the Jack-O-Lantern faces.


Wednesday, October 30, 2013

Black Widows

Samhain week continues today with black widow spiders!


The base is Sinful Colors Beau Brique, and I used Sinful Shine Dark Room for the webs and spiders. There's really nothing else to say about this manicure, though I had LOTS of fun drawing the webs! I'm not terribly happy with the spider, but it's good enough. The one on my dominant hand, however, I really really didn't like, so I'm not showing you pictures of my right hand this time. :)


Tuesday, October 29, 2013

More Halloween Water Marbling

As I mentioned yesterday, I had two Samhain-themed watermarble manicures for you. This time I used China Glaze Midtown Magic, Primark Beauty Neon Orange, and Sinful Colors Unicorn for the marbling.


A couple of fingers accidentally got some slight double-dipping when my nail touched down accidentally when I was dipping another one. Oddly enough, those two came out some of the most gorgeous nails due to the depth of the pattern!


The thumbnails came out the most like what I was going for in my swirling pattern, but I can honestly say that I love how each and every nail came out on this mani. It's just gorgeous, and I loved wearing it! I didn't want to take it off, but I wanted more Halloween nails! :)

Picture spam below...

Monday, October 28, 2013

Fall Marbling

It's the week of Samhain, so I bring to you my week of Halloween-themed nail art! For the first two days, I have two watermarbles that I tried. Please pardon the tip wear on these pictures - I took the pictures the second day, and for some reason they had already started wearing on the tips, which is not usual for me.


I started with a base of Sinful Shine Wisp on the nails to be marbled, and I used Barielle Aura Angora, China Glaze Coral Star, and China Glaze Midtown Magic for the marbling. My pinkies were done with straight Midtown Magic, and my thumbs (which I didn't bother to show) in just Coral Star.

I was going for a sort of candy corn type of pattern, and while it didn't come out as I envisioned (does watermarbling ever come out as expected?) it still came out pretty darned pretty. :)


Tuesday, October 22, 2013

Halloween Sunset

I've always loved the silhouette on sunset nails, and I finally got up the gumption to try it myself this week.


As you can see, it's well into October and I'm into my Halloween nails. But these came out so much better than I expected, that even the co-worker who doesn't do Halloween at all really enjoyed them. (Of course, as long as I keep them "harvest" or fall-themed, she can just not think about my pagan holiday and enjoy the pretties. :)


The sunset gradient was done with China Glaze Solar Power, Sinful Colors Timbleberry, Sinful Colors Beau Brique, and China Glaze Manhunt. The silhouettes were done with Sinful Shine Dark Room, which has been my go-to black of late.


Saturday, October 19, 2013

Cauldron Pumpkins

There's not much to say about this manicure. I received Lynderella Cauldron Drippings from an exchange buddy and squealed out loud when I pulled it out of the package, and proceeded to do a happy dance in the middle of my living room. It gave my kids and hubby quite the laugh! I really just wanted to put the pretty on my nails, but I had to do some sort of "art" as well, so what goes with Cauldron Drippings? Pumpkins, of course!


I wanted to see what CD would look like over two different polishes, so two of my fingers have Sinful Shine Dark Room as a base and two of them have China Glaze Midtown Magic. The pumpkin is done in Sinful Colors Courtney Orange over SS Dark Room. You actually could see a slight difference between the Dark Room base and Midtown Magic, but it was subtle, and I don't think it came through in the pictures. But that's okay, because I had lots of fun just wiggling my fingers around from time to time to watch the sparkle!


Wednesday, October 16, 2013

My BEST Nail Art EVER!

With a post title like that, I have to give you a picture of the finished manicure first, before I discuss anything else, just to prove I'm not exaggerating!


I really do think this is my best nail art I have ever done, in the nearly two years I've had this hobby. It looked for all the world like decals, or store bought nail polish strips, it was so amazing! I couldn't believe I had done this!

As for how I got there, well, I read a lot of blogs. Seriously, I have 378 blogs in my feedly under the category "Nails". Of those, only TWELVE blogs are also in the category "Art". These are the people who do actual artwork on the tiny canvases of fingernails. Of those, most of them use acrylic paints to do the artwork. I still absolutely adore admiring their artistry; however, I have no hope of recreating those manis on my own nails because I stick just to nail polish. There are a few of them, though, that do amazing, amazing! things with lacquer. Base Coat Top Coat is one of those peeps. Her gemstone series just blows me away. If you've never gone to check out her blog, I highly recommend setting aside a few hours to go through the archive. It's amazeballs, really. She also does amazing tutorials, but this is the first time I've attempted one.

I was trying to figure out what I wanted to do on my nails, and since I was on the phone with my bestest bud V already, I asked her to just pick a color. It gave me a place to start. She said purple, so I scanned through my 
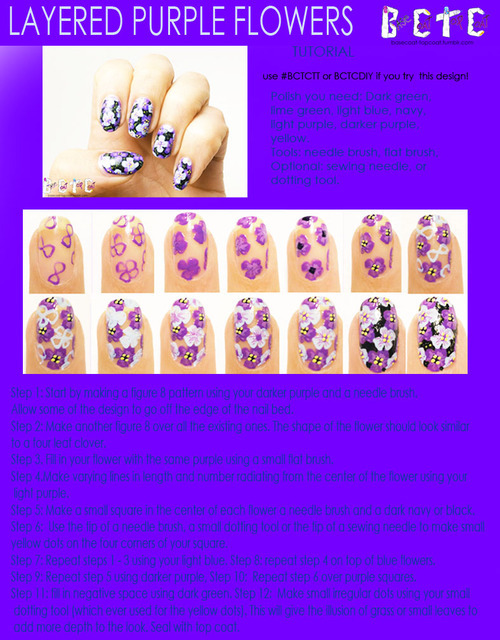
nail art pinterest board (where I pin the manicures I might want to try someday, along with some that just make me go WOW even though I know I can't ever do them) and this tutorial for "layered purple flowers" from BCTC hit me. I was fairly sure it was going to come out crappy - it tells you to do the flowers first and then fill in the background, and I was certain I was going to screw that up - but I wanted to give it a shot anyway.


I started with Wet N Wild Who is Ultra Violet? for the "dark" purple and Rimmel I Lilac You for the light. Sinful Shine Dark Room is used for all the black and Milani Whitest White for all the white sections, and Sally Girl Banana was used for the tiny yellow dots.


I followed this tutorial to the T as best I could (although on my dominant hand, I didn't make the figure eights; I just used a wider brush to splotch the petals on and the results came out pretty similar) and my results, I think, speak for themselves. (Which doesn't seem to stop me from babbling, of course.)


I kept this on my hands for an unprecedented entire week, because I couldn't bear to take it off. I was seriously getting the urge to paint new designs at least two days before I gave in and hit the acetone. I can't pick and choose the best pictures for this one, so I'll just put the picture spam below a cut for faster loading time.