Thursday, September 27, 2012

Week 39 - Dry Marble

Some days I'm a babble-ball, and some days I'm not. This is one of those 'not' days. It's a good thing you're here for the pretty pictures rather than my writing, eh?

This week's theme for A Year's Challenge is Dry Marble (also known as needle marble)! I felt like fall, and tried to pick some red/orange/yellow-ish colors. It ended up looking more like I dipped my fingers in blood than fall leaves, but as long as it's pretty, it works. :)

I started with two coats of Pure Ice Gold Mist, and then dotted on globs of China Glaze Adventure Red-y, Ruby Pumps, Kalahari Kiss, and Coral Star. I then used a fine dotting tool (feel free to grab a toothpick or needle if you don't have a dotting tool that comes to a point sitting handily at your workspace) and went to swirl-town. Short french-style tips, though I didn't tape and let the swirls make the "french" line wobbly as it pleased, and full-finger on the thumb and ring accents.


Friday, September 21, 2012

Plaid and Polka Dots

I love plaid manicures. I really do. But previously I've failed at creating a plaid manicure that I actually liked. I decided to try painting on scotch tape, cutting the tape into thin strips, and then putting those on my nails. Well, I love the way it looked, but it was sooooo time consuming to put down each little strip of tape, and very finicky at getting them positioned, that I realized that it would take me twice as long to position them on my dominant hand. So instead, I used the same colors to make polka dots!!


I am happy to say that I won Girls Night In's first ever giveaway recently (that makes three I've won in the past few months! My husband is wondering about the influx of packages! ;) and check out what she sent me!


From left to right, Ulta Eye Popping Poppy, China Glaze For Audrey, and Orly Fowl Play. Also a buffing block and a tube of foot scrub. (And a couple of pieces of candy that had my son complaining because he didn't get any. :P Mine!)

So I started this mani by painting all my nails with two nice coats of my favorite pale blue - Color Club Take Me To Your Chateau. I used Fowl Play, For Audrey, and China Glaze Frostbite to paint a few inches on Scotch Tape. After that was dry, I cut it into strips, put them onto my nails in a woven pattern, and top-coated the whole thing!

It was very tedious and took a lot longer than I expected it to. Much of it was spent with fiddling with the tape trying to get it into the right place, and straight, and weave it in with the other strips while not making it move again... I decided that it would probably take twice as long using my non-dominant hand to finagle the tape on my right hand, so I took the easy way out and used a dotting tool. Same colors: Orly Fowl Play, China Glaze For Audrey and Frostbite, and voila! (My Grammar!Bitch side is showing - doesn't "voila" have an accent on it somewhere? Harrumph.)

See my poor little index finger nubbin?? I am in dire need of more of the Haken Nail Magic base coat I used with such good results for months. I picked up the wrong one (still Haken, but not the same variety) last time I bought new base coat, and the original problem I had with flaking hasn't come back, I have had several side-breaks right at the edge of the nail bed that I've had to use the tea bag repair method on, and a few of them have broken off when they got a few millimeters past the end of the nail bed. That's why I trimmed down all the rest of them to a shorter length, so the nubbins wouldn't stand out so terribly badly! 


Wednesday, September 19, 2012

Week 38 - Metallic/Magnetic Nail Fail

Another semi-weekly installment of A Year's Challenge! Click on the link to see a list of the weekly themes and other amazing blogs that are following the challenges. I admit to having skipped last week's theme, because I honestly didn't feel like I would do it justice, and while I don't begrudge anyone else's desire to put a memorial/tribute to 9/11 on their manicures, it seemed too deep of a subject to put on my fingernails. If I had the creativity and artistic talent of 10 Blank Canvases or Sonoma Nail Art, then I would have tried my hand at giving homage. But my only creative talent lies in words, not pictures, so I declined.

But on to this week's attempt! And why I labeled it a 'nail fail' in the title of the post. If you've been reading my blog rather than just looking at the pretty (and sometimes not-so-pretty) pictures, you might remember that I've said my main failing is to not know when to stop? That I don't stick with simplicity? I always overcomplicate things? And I babble...but that usually makes people giggle rather than grumble, so I tend not to try to fix that one. ^_^


I'm really happy with the polish part of this manicure. I used Nabi Red Wine, and a straight line magnet on most of the fingers, and a star-shaped magnet on the accent nails - thumbs and ring fingers. If I'd stopped there, it would have been a beautiful manicure. Regrettably, I did not...


The stickers looked so cute on the sheet! They actually looked pretty cute going on my nails, too, but for several problems. The plastic was thick, so the cut edges of the stickers look extremely abrupt. That might have been okay, except that the stickers did not want to stick on a curved surface, like my nails. And topcoat? Didn't hold them down. At all. I ended up using nail glue to stick down a few stubborn edges!!


Also, do you see the difference between the different flowers? The pink, purple, and blue look like simple flat colors, while the green and yellow have holographic spots on them? There turned out to be a verrry thin clear plastic layer over the top of each sticker which decided to peel off overnight (and a few more peeled off after these pictures were taken, even!) Out from under two layers of topcoat, these things shed their iridescent film!

And the last annoying thing? One of the stickers either turned completely clear overnight, or it not only lost the iridescent layer, but the colored layer, too, leaving only a clear plastic bottom!


You see that index finger there? It was green when I went to bed the night I did these nails. I took these pictures the next day at lunch, as I frequently do to take advantage of the natural daylight for taking pictures, while I do my nails late in the evening most times.


In summary? I loved the magnetic polish (though the magnets that came on the lids are far too weak, but I fixed that by buying a 3-magnet set off of EvilBay) and HATED the stickers. I think I'll give the rest of the sheet to my short people (also known as spawn, or just children to normal people) to play with, as they're clearly not suited for nail adornment.

But at least that red striped sparkle is absolutely gorgeous!! :)

Monday, September 17, 2012

Gorramit!

That's such an emotive word - gorramit! Not quite onomatopoeia, since that's words for sounds that sound like the sounds (like bam or splat), but definitely an ideophone (words that evoke a vivid impression of certain sensations or sensory perceptions, e.g. sound, movement, color, shape, or action), at least to me. It just feels like a curse, the way your mouth wraps around it. 

But you're not here for my musings on phonosemantics! What you're interested in is the fact that I won a giveaway from Sassy Lacquer, and she gave me a bottle of Nerd Lacquer!! Specifically (if you haven't already guessed!) I got a bottle of Gorramit. She also gave me a bottle of Color Club Antiquated, which looks gorgeous in the bottle, but I haven't yet swatched (since I'm out of swatching sticks, but I have more slowly heading my way from Hong Kong.)


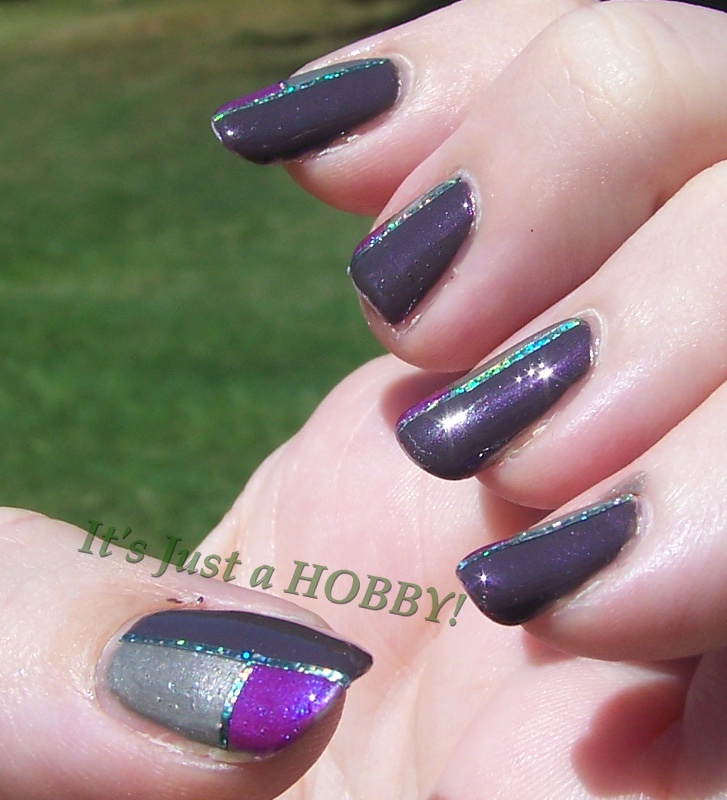
So today's manicure is made almost entirely of polishes that were given to me. :) I started with a base of 2 coats of Nailtiques Milan (which I mentioned in the last post about having received in a giveaway), except for my ring fingers, which got two coats of China Glaze Solar Power. I put tape down the middle of all my nails except the accents, and layered on one coat of Gorramit. I decided later to add a second coat to the accent nails for just a bit more density on the glitter, but I could easily have gone with just one.


At this point, I own polishes from about a half-dozen indie polish makers, but out of the ones with a variety of glitters, (as opposed to an even layer of shimmer or microglitter, like Girly Bits Street Magic or Windestine's Rainforest), this is hands down the most smooth application, with the MOST even placement of glitters I've seen thus far, including quite a few corporately produced glitters! I hardly had to dab glitter on at all, it just went smoothly across the nail, and a couple of strokes resulted in a surprisingly consistent layer of glitter across the surface.


If you can't tell, the lines of "dots" are made from individual glitters picked off the brush with a dotting tool, and laid in as straight a line as I could manage. There are orange hexes, yellow hexes of two different sizes, and red squares - at least that I can see clearly. :) This manicure is one of those rare times that it looks on the nail exactly as I envisioned it when I designed it! I love it when a plan comes together!

I freely admit that if I could pick one Nerd Lacquer out of all of them ever produced, Gorramit wouldn't be the one I'd pick (no matter how much I love Firefly, I just don't gravitate toward yellow polish), but nonetheless, it's gorgeous, and I now understand why exactly her polishes sold so amazingly well while she was producing them. The quality is simply stunning. So many, many thanks to Emily for allowing me to own an endangered species of polish before it goes completely extinct. :)


Thursday, September 13, 2012

Nailtique Nail Fail

I won a giveaway from Samariam's Swatches lately and received four packages of Nailtique polishes. Aren't these lovely?


The four colors shown, from left to right, are Shanghai, Rio, St. Croix, and Milan. So I wanted to do a manicure using all four colors! V had just purchased a package of four craft scissors in different cutting patterns because she wanted a zigzag design on her nails, so after I was done with her mani, I pulled out one of the other pretty patterns and cut some tape for me.

Despite the fact that the title of the post says "nail fail", I actually got a LOT of positive comments about these nails. My co-workers all loved them (and they're pretty reliable about telling me when they don't) but they're just not what I was hoping for. I think if I had put the Milan on the end, and used Shanghai for the dots instead, then it probably would have come out more like what I was mentally picturing. But the color difference between Rio and Shanghai just wasn't enough for the taping pattern to really show up.


I really like St. Croix, though. It's the only nude I really have, and if I used just two coats it would be great for french tipping. I used three coats to get this level of opacity.


Monday, September 10, 2012

nailXchange's Purple Passion Giveaway

nailXchange is having a Purple Passion Giveaway!


Go check it out, and then spend some time browsing their archives for some great nail art and polish swatching!

Holly and Polish is having a giveaway

The amazing lady over at Holly and Polish is giving away the entire OPI Germany collection!


Go enter her giveaway, and then stick around to browse her archives, because she does some beautiful swatching.

Brown and Beige Tones

Hello fellow nail art admirers, and welcome to my little corner of the nail art world. Okay, it's more like a cubby, or even a niche, not big enough to be a whole corner. In fact, I think I'm that little weird-shaped splotch on the wall over there...

Ahem. Since I only paint my nails twice a week usually, occasionally three times, I tend to choose my work clothes to match my nails most of the time rather than painting my nails to match an outfit. Sometimes I'll plan a manicure to match what I'm planning to wear to a board meeting, but even for that, more often than not I've done my nails a few days before and didn't think of it.

Such is not the case with the manicure I have for you today! While I was considering what I wanted to paint on my nails, the thought of a cute little summer blouse I own popped into my head, and I thought of a design to go with it!


I started with a base color of China Glaze Call of the Wild, and added one coat of Essie Luxeffects As Gold As It Gets. I added two lines of striping tape, and then painted the nail with China Glaze Kalahari Kiss. I really need to find a nice pale cream for my polish palette. I then finished up with a dotting tool using Call of the Wild and another China Glaze, Desert Sun.


Thursday, September 6, 2012

Week 36 - Tape Mani

Yet another week come and gone, and this week's theme for the Year's Challenge is tape! Now, there's two ways to use the word "tape" in a manicure. You can use tape to block off areas of your nails to paint them, or you can use striping tape on top. I did both!

I started with a base of two coats of China Glaze Hook and Line, and added topcoat on top of that. I put scotch tape across my nails as if I was going to do a french tip, and then on my left hand I did a stripe of China Glaze Reggae to Riches, while on my right hand I put China Glaze Jungle Queen across the tips of my nails.


Another lovely layer of Seche Vite to make sure the tape didn't pull up the color when I took it off, and scotch tape was again put down, but this time lengthwise and a bit off-center on my nails. On the left hand, of course, Jungle Queen was used for the vertical stripe, while the right hand got a larger stripe of Reggae to Riches. I only used one coat of each, so of course on the right hand, it created a four-block look, since RtR isn't opaque in one coat and Jungle Queen shows through.

Then I added the striping tape and another couple of layers of top coat - and for the first time in my own nail art history, I succeeded in getting striping tape to actually stay on my nails for more than a day! It wasn't until the third day that the striping tape started curling up in more than one spot.


I was really happy with this manicure. Though I will ask you to please forgive the lack of clean-up of the topcoat, as I was on vacation!


Monday, September 3, 2012

Extending Summer

It's the dog days of summer, and there are a lot fewer pretty wildflowers out in the yard. But I gathered up some earlier in the year and pressed them in a book to dry. Pulled them out this week and decided to use these bright yellow beauties on my nails!

I started with two coats of Color Club Take Me to Your Chateau. I added a topcoat, and then dotted some nail glue on each nail and laid down a flower or two. Trim it up to meet the edges of the nails, and more topcoat! I ended up with two coats of Gelous and one coat of Seche Vite and it still wasn't smooth! It stayed pretty for days, though, so I was happy. :)