Here's my last belated 52-week challenge post, for the week of 3/18. (Or at least the last one sitting in my box as of March 20th! I doubt I'll manage to consistently post promptly from this point on. Anyway, the week of March 18 has a challenge theme of "Inspired by a Tutorial", so after browsing through my Pinterest Nail Art board, I picked Wacky Laki's tutorial on freehand flowers:
Aren't they just gorgeous? I must say, I think a far better recreation job with this manicure than I have when imitating other people's nail art in the past!
Two of the polishes used had literally just come in the post the day I did this manicure. March is my month to receive polishes from my exchange group, so posts for the next month or so are likely to showcase new polishes each time. For this one, I started with a base of two coats Above the Curve - Caty Perriwinkle. It's a beautiful dusty lavender, or perriwinkle to be specific, with a holographic shimmer that doesn't show well in this manicure and in fact isn't obvious in the bottle, but it was a lovely surprise when I swatched it! It's a lighter color than these pictures show, with more gray and a lot less blue in the color than comes across. When I used flash, it came out pale lavender, and when I didn't use flash, it shows darker and more blue. This is the best I could do with my camera and lighting set up (I tried both indoor and out shots.)
I used my standard Milani Whitest White for the stripes (two coats for smooth opacity without brushstrokes) and after that was dry, dotting tools and a detail brush produced the flowers with the base outline color being my new bottle of Above the Curve Wisteria, topped with Whitest White on the small flowers and China Glaze Agent Lavender for the slightly larger ones, with center dots of first Sally Girl Banana and then Sinful Colors All About You.
Welcome to my hobby. It's not an obsession, it's not an addiction, but it IS quite fun! I don't take it too seriously, and neither should you. ^_~
Showing posts with label indie polish. Show all posts
Monday, March 25, 2013
Saturday, March 23, 2013
52-week challenge 3/11: violet
The next belatedly-posted weely challenge theme was the week of 3/11, with the theme of violet. I considered picking a purple nail polish, but I decided instead I'd rather do actual violet-type-flowers on my nails. Before I could tell them the theme, several co-workers who saw this manicure identified them as "either violets or pansies...but I think violets," so I must have gotten them close enough!!
The underwear is three coats of Sinful Colors Innocent, topped with one coat of Girly Bits Street Magic. I do love that polish, though it's extremely understated when worn on green. It really excels on black or dark brown, I have to say. I then dotted the violets with a base of Sally Hansen Blue Me Away topped with NYC Purple Pizzaz, to give them that nice indigo shade. Milani Whitest White for the center dot and lines, topped with just a dot of my brand-new Sinful Colors Unicorn for the center yellow of the flowers.
Aren't they pretty? What's your favorite spring flower?
The underwear is three coats of Sinful Colors Innocent, topped with one coat of Girly Bits Street Magic. I do love that polish, though it's extremely understated when worn on green. It really excels on black or dark brown, I have to say. I then dotted the violets with a base of Sally Hansen Blue Me Away topped with NYC Purple Pizzaz, to give them that nice indigo shade. Milani Whitest White for the center dot and lines, topped with just a dot of my brand-new Sinful Colors Unicorn for the center yellow of the flowers.
Aren't they pretty? What's your favorite spring flower?
Monday, March 18, 2013
Belated St. Patrick's Day Post
As in keeping with my habits of late, I've been doing my nails, taking pictures, but not writing the blog posts to go with them. I'm only a day late on this one, at least! I've also got a bonus mani for you done by my 9-year-old daughter on her own nails, and a picture of our homemade "Shamrock Shakes" that we had in celebration of the day (as well as a link to where we got the recipe, of course!)
First, my nails:
Let's see if I remember everything I used to make these pretties... I started off with a base of China Glaze Re-Fresh Mint. I then used Sinful Colors San Franciso for the next layer, and then used the saran wrap method to make it marbled. The next addition was one coat of Girly Bits Magically Delicious on the entire thumb and swooshed in a curve across one half of the rest of the nails. Sinful Colors All About You and a nail art brush produced a few accent curls, a shamrock on the ring finger and a four-leaf clover on my thumb. The clovers are a little subtle in the gold (and upside-down on my ring finger in this picture!) but they're very pretty in real life without just jumping out at you.
My 9-year-old B did these nails all by herself, from base coat to nail art. I did a bit of clean-up for her afterward, and did the topcoat for her as she was worried about smearing her beautiful shamrocks. The green splotches you can see here on various places of her fingers are actually green food coloring, not nail polish! She used a base of Sinful Colors Mint Apple and Nubar Greener for her shamrocks. I offered to show her an easy way to make shamrocks with a dotting tool, but she said that she could do them with just the nail polish brush...and proceeded to prove it!
I think she did a great job, honestly. These are adorable! And here is the source of her green-splotched fingers:
We made shamrock shakes - I measured out the ice cream and milk, and she measured out and added the peppermint and green food coloring to the mixer! Our inspiration and the source of the recipe was:
Enjoy! Hope you had as good of a St. Patrick's Day as we did!
First, my nails:
Let's see if I remember everything I used to make these pretties... I started off with a base of China Glaze Re-Fresh Mint. I then used Sinful Colors San Franciso for the next layer, and then used the saran wrap method to make it marbled. The next addition was one coat of Girly Bits Magically Delicious on the entire thumb and swooshed in a curve across one half of the rest of the nails. Sinful Colors All About You and a nail art brush produced a few accent curls, a shamrock on the ring finger and a four-leaf clover on my thumb. The clovers are a little subtle in the gold (and upside-down on my ring finger in this picture!) but they're very pretty in real life without just jumping out at you.
My 9-year-old B did these nails all by herself, from base coat to nail art. I did a bit of clean-up for her afterward, and did the topcoat for her as she was worried about smearing her beautiful shamrocks. The green splotches you can see here on various places of her fingers are actually green food coloring, not nail polish! She used a base of Sinful Colors Mint Apple and Nubar Greener for her shamrocks. I offered to show her an easy way to make shamrocks with a dotting tool, but she said that she could do them with just the nail polish brush...and proceeded to prove it!
I think she did a great job, honestly. These are adorable! And here is the source of her green-splotched fingers:
We made shamrock shakes - I measured out the ice cream and milk, and she measured out and added the peppermint and green food coloring to the mixer! Our inspiration and the source of the recipe was:
Enjoy! Hope you had as good of a St. Patrick's Day as we did!
Thursday, March 14, 2013
52-Week Challenge 3/4: Spring!
I'm running so behind on blogging about my manicures. I'm still doing my nails about twice a week, and taking pictures of them, but I've been so crazy busy at work that when I get home I just want to zone out and play Sims3 or read fanfic. I've been doing my nails for the challenge themes, really I have! (Even though I actually either forgot to take pictures of the 2/25 week theme - jelly sandwich - or I have lost them, because I did actually do the challenge theme that week, but I can't find any pictures of it. Bad Ro, no biscuit.)
I originally did this manicure just to highlight the gorgeous Dandy Nails - Piece of Youth, but when my co-workers looked at this manicure, the first word out of their mouth was "Spring!" (at least three of them, separately, squeed about the springy-ness of it, in fact) so I decided it qualified for this week's challenge theme.
This gorgeous glitter is the newest polish in my stash that I received from one of my fabulous exchange group, The Dirty Dozen (March is my month to receive, but she sent me this one early!) I am a US-shipping point for my group members out of the country who'd like to buy things from companies who only ship within the US, so I get to ogle their pretty polishes before I send them on. For the first time, though, this one tempted me soooo badly that I actually opened it and swatched it to see if it looked just as good on a nail (swatch stick) as it did in the bottle.
Turns out Dandy Nails - Piece of Youth? Actually looks BETTER on the nail than it does in the bottle! The bottle looks like the glitters are all clumping, and makes you think they didn't use a very good suspension base. I shook and shook and shook and it still looked like most of the glitter was stuck on one side of the bottle. But when I pulled out the brush and swiped it across the swatch stick? Plenty of glitter there! Pretty smooth placement, too. The microglitter brushed out pretty evenly and I only had to do minor positioning of the larger hexes. Of course, I'm a little OCD about symmetry, so others might not even need to do *any* positioning.
I mentioned to my DD-mate when I let her know her polishes had been shipped on that I had swatched one of them, and let her know how gorgeous I thought it was...so she asked if I'd mind if she bought me one as part of my package, early, and direct-shipped it to me? Did I MIND? Pretties! Pretty pretty pretties! YAY!
Ahem. No, I didn't mind at all. Thanks! :)
I started this manicure off with two coats of China Glaze For Audrey, a color that I don't typically like on its own, because I'm not a fan of greenish-blues, outside of actual, real turquoise stone. Dunno why, really. I don't even remember if I bought For Audrey for myself because this shade was missing from my paint palette, or if someone bought it for me. :P But it matched nearly perfectly with Piece of Youth, so there you go. I put two coats of Piece of Youth on my accent nails and on a taped off triangle on the rest of them. I outlined the taped areas with L.A. Colors BCC 570, and topped the points with a yellow rhinestones, and voila! Pretty springtime sprinkled on my nails! :)
Piece of Youth makes me think of robin eggs, actually, which is probably what contributes to the whole spring-feel of the manicure. I think that's more of a cultural identification, though, since robin eggs in crafts, candy, and pictures, seem to be often pictured as having yellow speckles, but as far as I can determine through a brief internet search, real robin eggs are uniformly blue. When the question is asked in places like ask.com and wiki.answers, blue speckled eggs are consistently identified as robin, whereas websites devoted to bird identification or bird watching refer to robin eggs as simply blue. No speckles mentioned on any of them I looked at. Some pictures seem to show some black speckling, but I suspect that's...ahem...other matter deposited on the eggs as they're laid. Weird the things you find out when you weren't thinking about it.
I originally did this manicure just to highlight the gorgeous Dandy Nails - Piece of Youth, but when my co-workers looked at this manicure, the first word out of their mouth was "Spring!" (at least three of them, separately, squeed about the springy-ness of it, in fact) so I decided it qualified for this week's challenge theme.
Turns out Dandy Nails - Piece of Youth? Actually looks BETTER on the nail than it does in the bottle! The bottle looks like the glitters are all clumping, and makes you think they didn't use a very good suspension base. I shook and shook and shook and it still looked like most of the glitter was stuck on one side of the bottle. But when I pulled out the brush and swiped it across the swatch stick? Plenty of glitter there! Pretty smooth placement, too. The microglitter brushed out pretty evenly and I only had to do minor positioning of the larger hexes. Of course, I'm a little OCD about symmetry, so others might not even need to do *any* positioning.
I mentioned to my DD-mate when I let her know her polishes had been shipped on that I had swatched one of them, and let her know how gorgeous I thought it was...so she asked if I'd mind if she bought me one as part of my package, early, and direct-shipped it to me? Did I MIND? Pretties! Pretty pretty pretties! YAY!
Ahem. No, I didn't mind at all. Thanks! :)
I started this manicure off with two coats of China Glaze For Audrey, a color that I don't typically like on its own, because I'm not a fan of greenish-blues, outside of actual, real turquoise stone. Dunno why, really. I don't even remember if I bought For Audrey for myself because this shade was missing from my paint palette, or if someone bought it for me. :P But it matched nearly perfectly with Piece of Youth, so there you go. I put two coats of Piece of Youth on my accent nails and on a taped off triangle on the rest of them. I outlined the taped areas with L.A. Colors BCC 570, and topped the points with a yellow rhinestones, and voila! Pretty springtime sprinkled on my nails! :)
Piece of Youth makes me think of robin eggs, actually, which is probably what contributes to the whole spring-feel of the manicure. I think that's more of a cultural identification, though, since robin eggs in crafts, candy, and pictures, seem to be often pictured as having yellow speckles, but as far as I can determine through a brief internet search, real robin eggs are uniformly blue. When the question is asked in places like ask.com and wiki.answers, blue speckled eggs are consistently identified as robin, whereas websites devoted to bird identification or bird watching refer to robin eggs as simply blue. No speckles mentioned on any of them I looked at. Some pictures seem to show some black speckling, but I suspect that's...ahem...other matter deposited on the eggs as they're laid. Weird the things you find out when you weren't thinking about it.
Monday, January 14, 2013
Blue Ice Bling
My friend V wanted some beautiful nails when she was heading down to Texas to visit with her family for a week over the holidays, so we decided on a cool snowy shimmer. We started with a base of Wonder Beauty's Diamond Dust, and then did various curling stripes with Sally Hansen White On and Cover Girl Electric Blue.
The addition of rhinestones was the needed final touch to make this manicure look flowing and alive. V was really hesitant as I was painting this. She'd look at the swirls and look at the manicure picture we were emulating (a manicure by Eye Candy Nails in the UK), and make worried comments about how it didn't look right. I would point to a spot and tell her the rhinestones were going here, or there, or along that line, and she'd back down...but it wasn't until I actually started applying the rhinestones that her eyes lit up. "Oooh I will never doubt you again!" she claimed. Hah! I'll believe that when I...well, don't hear it! :)
Friday, January 11, 2013
Three Golden Stripes
Another one of the manicures I did just before the holiday break was this gorgeous glitter fest. It's so hard to get dark colors to show up color accurate on my camera, but this picture has the closest I could get, but only on the index finger! But isn't it just beautiful? I looove the rich and dark emerald green that I got by putting Windestine Rainforest on top of OPI Live and Let Die!
The base color underneath is two coats of China Glaze I Herd That. A coat of top coat across the glitter bomb, three pieces of striping tape on each nail, and one coat of Live and Let Die topped with one coat of Rainforest results in this subtle and elegant shimmer bomb.
I tried to get an out of focus picture to show off just how much this manicure was actually sparkling, but none of them came out quite as I wanted. This was the closest I got, though the thumbnail on the left picture above certainly shows off the multicolored sparkles of I Herd That along with the green/gold glitters of Rainforest.
The base color underneath is two coats of China Glaze I Herd That. A coat of top coat across the glitter bomb, three pieces of striping tape on each nail, and one coat of Live and Let Die topped with one coat of Rainforest results in this subtle and elegant shimmer bomb.
I tried to get an out of focus picture to show off just how much this manicure was actually sparkling, but none of them came out quite as I wanted. This was the closest I got, though the thumbnail on the left picture above certainly shows off the multicolored sparkles of I Herd That along with the green/gold glitters of Rainforest.
Labels:
China Glaze,
glitter,
indie polish,
OPI,
stripes,
Windestine
Monday, September 17, 2012
Gorramit!
That's such an emotive word - gorramit! Not quite onomatopoeia, since that's words for sounds that sound like the sounds (like bam or splat), but definitely an ideophone (words that evoke a vivid impression of certain sensations or sensory perceptions, e.g. sound, movement, color, shape, or action), at least to me. It just feels like a curse, the way your mouth wraps around it.
But you're not here for my musings on phonosemantics! What you're interested in is the fact that I won a giveaway from Sassy Lacquer, and she gave me a bottle of Nerd Lacquer!! Specifically (if you haven't already guessed!) I got a bottle of Gorramit. She also gave me a bottle of Color Club Antiquated, which looks gorgeous in the bottle, but I haven't yet swatched (since I'm out of swatching sticks, but I have more slowly heading my way from Hong Kong.)
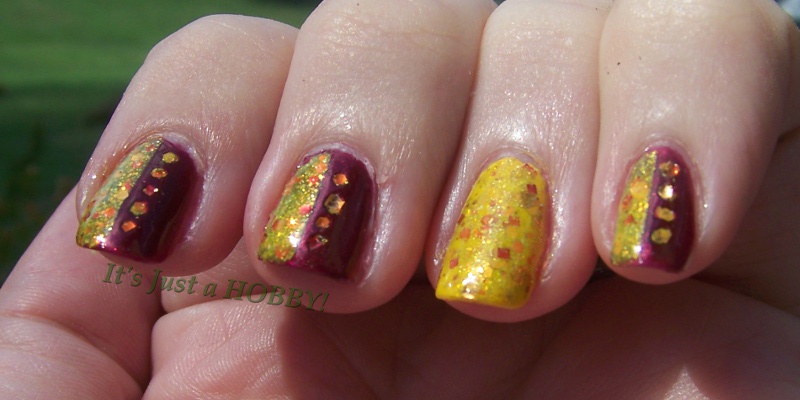
So today's manicure is made almost entirely of polishes that were given to me. :) I started with a base of 2 coats of Nailtiques Milan (which I mentioned in the last post about having received in a giveaway), except for my ring fingers, which got two coats of China Glaze Solar Power. I put tape down the middle of all my nails except the accents, and layered on one coat of Gorramit. I decided later to add a second coat to the accent nails for just a bit more density on the glitter, but I could easily have gone with just one.
At this point, I own polishes from about a half-dozen indie polish makers, but out of the ones with a variety of glitters, (as opposed to an even layer of shimmer or microglitter, like Girly Bits Street Magic or Windestine's Rainforest), this is hands down the most smooth application, with the MOST even placement of glitters I've seen thus far, including quite a few corporately produced glitters! I hardly had to dab glitter on at all, it just went smoothly across the nail, and a couple of strokes resulted in a surprisingly consistent layer of glitter across the surface.
If you can't tell, the lines of "dots" are made from individual glitters picked off the brush with a dotting tool, and laid in as straight a line as I could manage. There are orange hexes, yellow hexes of two different sizes, and red squares - at least that I can see clearly. :) This manicure is one of those rare times that it looks on the nail exactly as I envisioned it when I designed it! I love it when a plan comes together!
I freely admit that if I could pick one Nerd Lacquer out of all of them ever produced, Gorramit wouldn't be the one I'd pick (no matter how much I love Firefly, I just don't gravitate toward yellow polish), but nonetheless, it's gorgeous, and I now understand why exactly her polishes sold so amazingly well while she was producing them. The quality is simply stunning. So many, many thanks to Emily for allowing me to own an endangered species of polish before it goes completely extinct. :)
But you're not here for my musings on phonosemantics! What you're interested in is the fact that I won a giveaway from Sassy Lacquer, and she gave me a bottle of Nerd Lacquer!! Specifically (if you haven't already guessed!) I got a bottle of Gorramit. She also gave me a bottle of Color Club Antiquated, which looks gorgeous in the bottle, but I haven't yet swatched (since I'm out of swatching sticks, but I have more slowly heading my way from Hong Kong.)
So today's manicure is made almost entirely of polishes that were given to me. :) I started with a base of 2 coats of Nailtiques Milan (which I mentioned in the last post about having received in a giveaway), except for my ring fingers, which got two coats of China Glaze Solar Power. I put tape down the middle of all my nails except the accents, and layered on one coat of Gorramit. I decided later to add a second coat to the accent nails for just a bit more density on the glitter, but I could easily have gone with just one.
At this point, I own polishes from about a half-dozen indie polish makers, but out of the ones with a variety of glitters, (as opposed to an even layer of shimmer or microglitter, like Girly Bits Street Magic or Windestine's Rainforest), this is hands down the most smooth application, with the MOST even placement of glitters I've seen thus far, including quite a few corporately produced glitters! I hardly had to dab glitter on at all, it just went smoothly across the nail, and a couple of strokes resulted in a surprisingly consistent layer of glitter across the surface.
If you can't tell, the lines of "dots" are made from individual glitters picked off the brush with a dotting tool, and laid in as straight a line as I could manage. There are orange hexes, yellow hexes of two different sizes, and red squares - at least that I can see clearly. :) This manicure is one of those rare times that it looks on the nail exactly as I envisioned it when I designed it! I love it when a plan comes together!
I freely admit that if I could pick one Nerd Lacquer out of all of them ever produced, Gorramit wouldn't be the one I'd pick (no matter how much I love Firefly, I just don't gravitate toward yellow polish), but nonetheless, it's gorgeous, and I now understand why exactly her polishes sold so amazingly well while she was producing them. The quality is simply stunning. So many, many thanks to Emily for allowing me to own an endangered species of polish before it goes completely extinct. :)
Saturday, July 21, 2012
Week 29: "Rock Star" Nails
Doing a google search on rock star nails leads to a lot of different manicures, but glitter bombs tend to be in the majority.
I started with a basic shimmery green that's new to my stash: Avon Nailwear Pro+ in Absinthe. Then I layered three different flakies over it - Nubar 2010, Sinful Colors Green Ocean, and Zoya Opal, in that order. For accent nails, on my ring finger and thumb, I used glitters instead of flakies: CND Gold Shimmer, follow by Windestine Rainforest and Sinful Colors Call You Later. Then I topped all the nails with a thin coat of Sinful Colors San Francisco.
A few days later, I added some taping with China Glaze Smoke and Ashes.
I started with a basic shimmery green that's new to my stash: Avon Nailwear Pro+ in Absinthe. Then I layered three different flakies over it - Nubar 2010, Sinful Colors Green Ocean, and Zoya Opal, in that order. For accent nails, on my ring finger and thumb, I used glitters instead of flakies: CND Gold Shimmer, follow by Windestine Rainforest and Sinful Colors Call You Later. Then I topped all the nails with a thin coat of Sinful Colors San Francisco.
A few days later, I added some taping with China Glaze Smoke and Ashes.
Monday, July 9, 2012
Vacation Nail Haul & Mani
I just got back this weekend from a week's vacation - my first actual, full vacation as an adult! (Yes, I'm almost 42 and I've never taken a vacation. I've had days off, lots of maternity leave, but no *vacation* where you take a full week off work and actually go somewhere as a family.) Well, my newly-adult daughter, Grace, is staying with us for a month this summer, between graduating high school and heading off to University this fall. So what better time? We spent three days visiting my dad and sister in KC, then headed down to Branson for a day and a half at Silver Dollar City, and then a day at the beach on Table Rock Lake. Despite the heat wave (thank goodness for water rides!) we managed to keep hydrated and thoroughly enjoy ourselves.
While we were at my Dad's place, one of my sisters decided to get rid of the last of her polish stash, so Grace and I split it between us. Here's my half of the haul! ::insert evil laugh here - Bwahahahaha!::
From left to right, that's Cover Girl Electric Blue, Sally Hansen Chrome in Gilded Pearl, Opal, and Black Pearl, then Avon Nailwear Pro+ (the glitters) and Nailwear Pro (the non-glitters) in Ruby Slippers, Lucky Penny, Absinthe, Vintage Blue, and Jade.
I also gathered Avon Mosaic Effects (otherwise known as crackle, duh!) in black and white, and two Avon Mirror Shines in Peace Ice and...well, the label says "Polish" but I don't know why they'd name a polish "Polish". WhatEVAR, moving on! Color Trend Refreshing Pear and some unnamed mini Lisa Frank Nail Magic. Is pretty, though!
And now I need to buy more swatching sticks, can you believe it? I think I have two or three left. Maaaaybe four. But I have 141 polishes on my shelf! (I bought 150 swatching sticks, and of course a few were cracked/broken.)
Last, but not least, lots of stickers/rhinestones/pretty things to stick on my nails!
I am sad to say that my right-hand middle finger was a casualty of war, though. It broke off at the quick while we were camping. Bad Ro for having nude nails for two days! If I'd taken the time to put a coat or two of basecoat on them, at least, it probably wouldn't have happened. But we had fun-filled days and we were TAHRED! (that's Texan for plumb worn out, by the way) when we got back to camp each night.
I did put on a basic manicure once it had broken, though, to ensure no more nails would go the way of my poor middle nubbin. I put on a couple coats of my wonderful Haken Nail Magic, then a couple of coats of my brand-new gifted polish, Avon Ruby Slipper, and then I added a gradient of Windestine Star Bright to the top half of my nails, and added a full accent nail of Star Light to my ring fingers.
At least I stayed with the patriotic theme for the week, yeah? ^_^ I mean, look, there's stars and bars right on my nails!
Would anyone like to share their tips or techniques for taking care of their nails while away on vacation? I'd love to hear them!
Labels:
Avon,
Cover Girl,
glitter,
Haul,
indie polish,
Sally Hansen,
Windestine
Subscribe to:
Posts (Atom)


