Showing posts with label stripes. Show all posts

Friday, October 17, 2014

Purple Warp Speed


There's not a whole lot to say about this manicure. It's plain and simple stripes, but it was a fun look! I have no idea why I think of warp speed when I look at it, but there you go. My co-worker L named is Stripes at Sunset. :)

The base color is Nabi Holographic Purple (yeah, that's the only name on the bottle!) and while I know the name of the black I used is Sinful Shine Dark Room, I don't remember the name of the blue, though it also was Sinful Shine, which shouldn't make it too hard to google the name, come to think of it... Ta da! It's Alfresco.


Tuesday, March 12, 2013

March Polish Days - Vintage


VINTAGE

As you can see, this month's Polish Days theme is Vintage! The last time I had this theme, I ended up with what is usually referred to as "vintage roses", even though I took the pattern off of a rug in a very old advertisement. This time I wanted to go with something different...even though I still ended up with some floral elements.

I started by googling "vintage patterns" and after adding six new pictures to my "Inspirations for Nail Art" folder on my pinterest board, I decided on this:


 This picture is from a listing on Etsy (which was sold last summer) for a Super Mod dress from the 70's. I used Milani Whitest White, NYC Black Lace Creme, China Glaze Kalahari Kiss, and Primark Beauty orange neon in my recreation.


It was late at night on a Sunday, I hadn't intended to do my nails until Monday night, but I'd apparently worn my manicure one day too long as first one nail broke and the nail polish didn't just chip, the polish popped off the entire nail. I intended to just repair that one nail but five minutes later when I sat down to fix it, I discovered another (unbroken) nail on the other hand was missing its polish. So here I am, tired and ready to hit the sack, but I have a meeting at work the next day and I want a full manicure. So I went ahead with this one...but I didn't have the time or patience to use striping tape, so those stripes are free-handed.

And then, of course, I had NO desire to attempt free-hand stripes on my dominant hand!! Out come the handy-dandy dotting tools instead! Using the same colors, I made what I think is a very period-accurate floral print to go with the stripes on the other hand.


So that's my interpretation of this month's theme. Now go check out everybody else's gorgeous nails!

Thursday, January 31, 2013

Purple Stripes

There have been a lot of times over the past few weeks when, for one reason or another, I didn't get around to doing my nails in the evening as I usually do. This has led to me looking at my stash shelf in the morning, trying to think of something I can do to my nails in a half-hour to an hour that still qualifies as "nail art". A few times I've packed a few polishes and tools into a bag and done my nails over my lunch hour!

I don't remember if I did this one before I went to work or at lunch, but this manicure was definitely one of those decided and designed quickly.


The base color is Avon Mirror Shine Polish, followed by a stripe down the middle of Orly Fowl Play. A manicure that only needed clean-up where my non-dominant hand shook too much! I've actually reached the point where I hardly have to do clean-up on the base color polish. After a year at this nail art stuff, it's about time my hands got steady enough to do that!


I really liked the effect I got from the stripe of Fowl Play over the bright lavender chrome! Please ignore the piece of missing polish on my left hand index finger. I work in an office, and while I love having nail art as my hobby, I consider my nails to be just as much of a tool as my feet, hands, ears, and teeth. It's not unusual for my fingers to be peppered with paper cuts and I'm never going to be one of those people who opens cabinets with their knuckles to avoid breaking a nail. Nail art is fun, but my nails will never be my obsession. Which isn't to say I think badly of those who are that careful of their nails, of course, but it's not and never will be my priority. (Now, if you want to see me get touchy about one non-practical, strictly decorative, portion of my body? Tell me I should cut my hair and watch how fast I growl. ^_~)


Friday, January 11, 2013

Three Golden Stripes

Another one of the manicures I did just before the holiday break was this gorgeous glitter fest. It's so hard to get dark colors to show up color accurate on my camera, but this picture has the closest I could get, but only on the index finger! But isn't it just beautiful? I looove the rich and dark emerald green that I got by putting Windestine Rainforest on top of OPI Live and Let Die!


The base color underneath is two coats of China Glaze I Herd That. A coat of top coat across the glitter bomb, three pieces of striping tape on each nail, and one coat of Live and Let Die topped with one coat of Rainforest results in this subtle and elegant shimmer bomb.


I tried to get an out of focus picture to show off just how much this manicure was actually sparkling, but none of them came out quite as I wanted. This was the closest I got, though the thumbnail on the left picture above certainly shows off the multicolored sparkles of I Herd That along with the green/gold glitters of Rainforest.


Saturday, January 5, 2013

Sparkles N Stripes

This manicure I did over the holiday break for my New Year's Eve bling, and all the polishes I used were from presents! The base color, NYC Nail Glossies 243B, was in my stocking (okay, technically I bought it for myself, since I'm the MOM and I bought the stocking stuffers...but it still qualifies as a present, because I opened my stocking the same time my kids did! ;) This was topped by Sinful Colors Nail Junkie, which a co-worker presented to me a few months back for no reason whatsoever except that she was browsing in the cosmetics section and thought of me when she saw it. And finally, it was topped with stripes of China Glaze Pure Joy, which was one of four polishes my best friend V gave me for the holidays! :)


Thursday, January 3, 2013

Week 51 - Red - So late!

I took a few weeks off from blogging for the holidays! It wasn't entirely intentional...or at least not planned, anyway. I work at a University, which closes completely between Christmas Eve and New Year's Day, and I spent that time at home and hardly even looking at the internet. I only checked Facebook enough to keep up with my out-of-state family and didn't even read nail blogs at all! Wow. I did, however, actually do my nails and take pictures. I just didn't post about them.

So here's the belated post for week 51 of The Year's Challenge, which was Red.


I used Sally Hansen White On and Cardinal for these candy cane stripes. I was not really happy about this manicure, though, but I wasn't annoyed enough by it to take it off and try again! My free-hand stripes leave much to be desired, but I was too lazy (holidays!!) to use the amount of layers and tape that would be required to tape off these very thin stripes.

I was also annoyed that despite waiting almost an hour after painting the stripes, the top coat still blurred the red into the white. While I like the Sally Hansen colors - which is why they're still in my stash - I'm really not fond of the formula of their polishes. At least not the lower priced ones. 

So, I hope you all had wonderful holidays - whether you celebrate the Solstice like I did, Christmas, Hannukah or Kwanzaa, I wish you all joy in your relationship to whatever you hold holy, and I hope you all have a wonderful new year. You can expect to see two to three posts a week from me until all my backlog is posted, I imagine. :)

Tuesday, October 2, 2012

"This is Halloween" - Day 1

I'm a late entry to this challenge because I am running behind in reading my nail art blogs and only saw the challenge this morning. I LOVED the idea, though, and decided I was going to start my participation as soon as I got home!


I have to thank Lacquer Dreams for coming up with this challenge. I love Halloween, it's one of my favorite holidays. I'm pagan, as well, so it's like New Year's AND Halloween AND it's my wedding anniversary, all rolled up into one fun day. So of course I'm going to jump on the bandwagon for a Halloween-themed challenge for my first Halloween since I started doing nail art!

So, horror movie. I love horror movies. I love the campy, cheesy ones, and I love the edge-of-your-seat nail biting ones. I especially love supernatural horror rather than the plain old serial killer version. But oddly enough, the movie I chose to base my nail art on is one I really don't care for. It's not that I dislike it, I just don't particularly like it. It does, however, have a certain odd sentimental value in my family because it was the first movie my daughter, Brianna, actually sat still for and watched all the way through. The movie that hyperactive little three-year-old decided was worth sitting still for a full 87 minutes for? Child's Play. There are reasons we call her a cross between Princess Barbie and Wednesday Addams, people! :)


I started with a base layer of two coats of Milani Whitest White on all of my nails, then I used China Glaze Frostbite, Avon Vintage Blue, Primary Beauty Pink Neon, and China glaze Adventure Red-Y to mimic the stripes on Chucky's shirt. I used Sally Hansen Black Pearl Chrome and Sinful Colors Celeb City to make the butcher knife and Adventure Red-Y and China Glaze Salsa to make the blood.


I tried - and failed miserably - to draw Chucky's face on my thumbnail. It's horrible, I know, and after I've let my co-workers see my horrible rendition of it tomorrow, I'll paint over that ugly mug.


I didn't even attempt to do any pictures on my off-hand, of course. I put the same stripes on, though quite a bit shakier drawing with my left hand, and I used a coffee stirrer for a straw to make blood splatters on my accent fingers, again with Adventure Red-Y and Salsa.


I enjoyed seeing all the other entries in this challenge, and I'll do my best to make sure all the rest of my entries are actually on the day they're scheduled for. Thanks for playing! Now, go check out all the other pretties:

Friday, August 17, 2012

Chunky Copper Chops

I'm sure most of you who share my hobby are aware of Copious and their habit of semi-regularly offering free credits to members (and, of course, if you haven't tried them out, click here to get a $10 credit for signing up!) I managed to catch the latest $10-credit being offered to existing members, and snagged two KleanColor polishes: Military Green and Chunky Copper. The day they came in the mail, I was so enamored of them, I had to use them right away.


Aren't those gorgeous?! I started with a base color of the Military Green, and covered the thumb and ring fingers with two coats of Chunky Copper. This glitter has two different colors of large hexes, gold and copper, as well as lots and lots of medium and small copper hexes. (If any of the smaller hexes are gold rather than copper, I can't see them.) I'm not sure why the same two coats came out with such a different amount of glitter on my thumb versus my ring finger, though I suspect I was spreading the same amount of glitter out on the larger surface area on the thumb, since this difference in density held true for my other hand as well.

I added a slanted french tip in China Glaze Exotic Encounters, added a stripe in Avon Lucky Penny, and then outlined the stripe in China Glaze Prey Tell. I also used dotting tools in three sizes to layer dots of Prey Tell, Exotic Encounters, and then topped with Lucky Penny. It doesn't show up as well in the pictures, but Lucky Penny is almost exactly the same color as the copper hexes in Chunky Copper.

Look at these pictures out in the sunlight - that Chunky Copper is practically on fire and you can see it actually reflecting the sunlight onto my middle finger!


Almost every one of my co-workers who oohed and aahed over this manicure had to run their finger over my ring fingernail because the glitter was so three dimensional! Even though in reality, it actually laid pretty flat, and two coats of Seche Vite on top means the surface of my nail is almost completely smooth, but even with that, the way the light shines on the copper hexes makes them look like they're curling upward. I don't know what makes them look that way, but it's very eye-catching!


Wednesday, August 15, 2012

Show Some School Spirit!

It's that time of year on college campuses across America - the horde is descending upon us! Otherwise known as the students returning, of course. :) In fact, my oldest daughter is moving in to her very own dorm room at University of Kentucky this week. We did, however, have some fun-spirited arguments while she was visiting me this summer, regarding her chosen institution of higher learning versus the one I work at. Heh...

But on to the nails! It was Orientation Day for new students in V's department this week, and all the staff were encouraged to wear red to show off our school pride. (Cardinal Red is the University of Arkansas school color, after all!) So, in the same spirit, we decided to show off her school spirit on her nails!

Please forgive the quality of the pictures today - it is a very busy time at work for us, and the sun refused to cooperate to shine upon her nails when we were taking them, so we resorted to flash. Neither picture is quite color-accurate, as the reality is somewhere in between the two.


We started with a base of China Glaze Adventure Red-y from our newly acquired On Safari Collection. We added french tips in NYC Broadway Burgundy Frost (and a full nail coverage on the ring finger for accent), and then drew a line between the two in Milani Whitest White. I thought about drawing some sort of design on the accent finger...but then I decided that writing UA would go best with the rest of the manicure. Not that I'm all that good at printing letters in nail polish...yet!


As usual, red is a bitc-a to clean up, leaving cuticles to look like they're inflamed for some reason, but thankfully it's far less noticeable in real life. Go Hogs!

Friday, June 22, 2012

Fashion Fuschia

Okay, these are more pink and purple than fuschia, but the alliteration was too cute to pass up! :)

My friend V had another job interview, so she came by the night before for a manicure to match her clothes. I tried taking a picture of this fabric in a half-dozen different lighting situations and couldn't get the color to come out accurately, but this lighting came pretty close.


We hit my swatch sticks to match up colors and we got the closest match with China Glaze Reggae to Riches and L'Oreal Violet. I experimented with a few different patterns on a swatching wheel before we decided what to go with. I tried using a straw to get the half-circles but while I would have liked the result for a playful manicure, it didn't really come out looking professional, so we decided against it for a job interview. I also tried to do some freehand curves, and that just was a total nail fail. We decided it was better to match the geometric starkness of the stripes rather than try to replicate the curves, so we went with a striping tape mani.

I started with a base coat of Milani Whitest White, then laid down some striping tape on a diagonal. L'Oreal Violet on the cuticle end of the nail, China Glaze Reggae to Riches on the tip, and China Glaze Liquid Leather in a stripe between the striping tape strips. Macro pictures are not forgiving to precision nail art, but it looked pretty darned good in real life!


Tuesday, June 19, 2012

Week 25: Rainbow/Pride

Hello, my fellow hobbyists! This week's theme in the Year's Challenge is "Pride/Rainbow mani". I couldn't think of any way to make this more Pride and less Rainbow other than adding LGBT symbols, which I think might have been just a bit too much for my office. If you have any suggestions, please share. I'll probably facepalm for not thinking of something, but I've got a few nails left - I might add your suggestion! In the meantime, here's my rainbow!


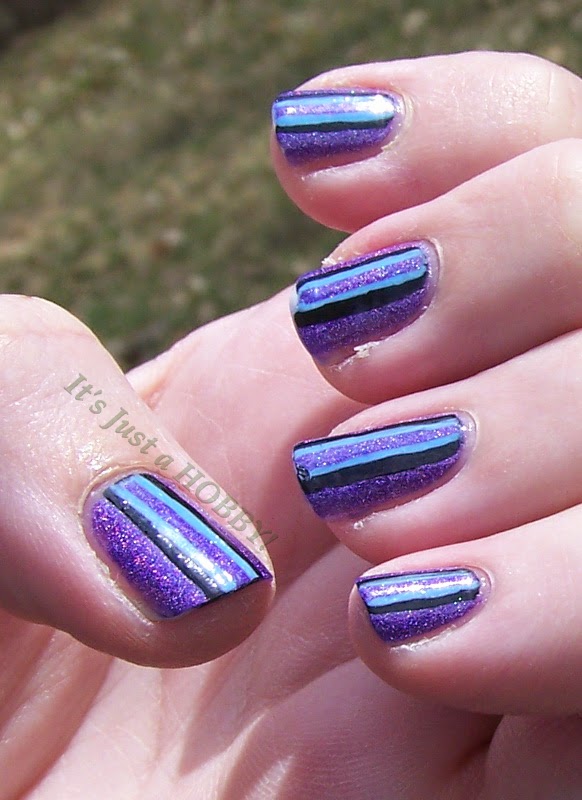
I'm not real sure what happened to the cloud on my index finger. That's two full layers of Milani Whitest White over those stripes, and it was fully dry and opaque when I put my Seche Vite on it. I noticed before I went to bed last night that the green and purple stripes were very faintly visible as dark lines...but this morning when I got up, there's full blown green and purple lines there! I didn't really have time before work to add another layer of white and another top coat, so this is what you get. (Of course, one of my co-workers suggested that I not admit to that being an error and just call it a cool special effect! ;)

A few weeks back, I realized that the only pale blue I have is my Sally Girl Coconut, and it's a grey-toned blue. I wanted a nice light baby blue, so I asked for suggestions on Polishaholics Anonymous. I got a list of great suggestions, but none of them were exactly what I wanted. I was planning on picking up Essie Borrowed and Blue as well as China Glaze Bahamian Escape, though the Essie was really lighter than I wanted, and the China Glaze darker. Then I got ahold of a $10 Copious credit, and lo and behold if I didn't find a bottle of Color Club Take Me To Your Chateau, which hadn't even been on the list of recommendations! The swatches I saw on the 'net varied a bit, but I thought it had a good chance of being what I was looking for, so I bought it. (Besides, I couldn't go wrong with polish for a penny!) It turned out the polish gods were favoring me, because it's exactly what I was looking for! 


Look at that gorgeous creaminess! It's opaque in one coat, but a little thick and streaky, but two coats evens it out just perfectly. I wanted a shimmery rainbow, so I picked out Zoya Karina, Sinful Colors Courtney Orange, China Glaze Solar Power, Sinful Colors San Francisco, Pure Ice Strapless, and Sinful Colors Daddy's Girl. While my striping may lack some professionalism, those colors don't! They just POP! My nails are so awesome today - I keep stealing glances at them as they dance over my keyboard.

On my other hand I wanted to try some different things, so I experimented a bit. I wasn't happy with my attempt at a fishtail braid (next time, bigger stripes and more drying time between stripes!) but my middle nail turned out better than I could have hoped for.


I used the same striper brush on the fishtail as I did on the rainbow on my left hand, and really, the stripes are too narrow for the pattern to show. It just looks like a mash of colors, and it's really dark with the yellow really popping out more than it ought. To make the blended nail, I did two colors at a time, like you do for a one-stroke flower. A dot of red on my palette next to a dot of orange, put both on my brush at the same time, and swipe it across my nail. I made sure to go over each stroke a couple of times to blend the colors together, and then I cleaned my brush and did the next section with orange and yellow at once. The orange section actually looks more orange and less muddy brown in real life, but it's just a gorgeous feathered texture, a wind-blown rainbow across my nail!


Tuesday, June 12, 2012

Batteries Not Included

The only thing better than nail mail is surprise nail mail! Well, I knew I had placed an order from Spooky Bones for an upcoming exchange in my birthday group (not telling which month it's for, of course! ;) but I had totally forgotten that I'd ordered a polish for myself at the same time! Wasn't *that* a pleasant surprise?? Of course, I had to pop it on my nail the very next day. Copper Top "Batteries Not Included" is a gorgeous copper, of course, with every shape of copper glitter you could possibly think of thrown in there. Several sizes of hexes, bars, diamonds, and flakes! As one of the pictures shows, the diamonds (at least) are holographic. All I know is that it's gorgeous. Although I will admit to having a preference for glitters in clear polish rather than tinted - I dislike having the glitters covered in the polish color.

To go with this gorgeous polish, I started with a base of 2 coats of Pure Ice Gold Mist. I added one coat of Copper Top on my nail and ring fingers, and then using a striper brush and a dotting tool, added the design on the rest of the nails in China Glaze Harvest Moon. I've gotten a lot of compliments on this one around the office.


I love the way this mani shines at different angles. It doesn't have to be a duochrome to enjoy the play of light on a glitter!


What are your favorite Indie polish companies? Do you have a ♥-on for any of the lesser-known ones? (Like Windestine or Victoriana as opposed to Lacquistry or Cult Nails?)