Showing posts with label inspired by.... Show all posts

Monday, April 1, 2013

MSMD - "Brushstroke" Technique

It's my very first Monkey See, Monkey Do Monday! I copy other people's ideas often enough anyway; I might as well make it official. ;)

I was so inspired by The Swatchaholic's entry to March Polish Days - Vintage that I did my own version of it that very evening! And then it took me a few weeks to find where I'd downloaded the pictures. Admittedly, sometimes I do the editing at work during lunch hours and sometimes I do it at home over the weekend, but I still don't know how these pictures got to the folder they ended up in, which was not the right place on either computer...

This was the Swatchaholic's absoloutely beautiful brushstroke technique manicure:


She was using a "vintage" polish to go with the March theme, but what really struck me was how much like gemstones her nails looked. So I went through my swatchsticks picking out polishes that shone and glowed and glittered like hers! My nails came out completely different, but I loved them. They were beautiful, and even my co-workers really oooh'ed and ahh'ed over these pretties.


I used a base of Sinful Colors Winterberry, though like TS's comment, I could really have gone without a base color at all, by the time I was done. I lined up the following bottles on my desk: Sinful Colors Daddy's Girl and Purple Diamond, China Glaze Ruby Pumps and Riveting, Avon Lucky Penny, Color Club Antiquated, and a little mini Lisa Frank Nail Magic with no name but is a sheer pink shimmer. I loosened them all up, and one at a time, scraped most of the polish off the brush and put just a swoosh on each nail in random places. I went across all ten nails with the first color, then followed immediately with the second color, etc. I went through the entire row of polishes twice, then hit it with a top coat of Seche Vite and this was the lovely result!


Given how little polish was going on in each brush, I didn't even have to wait for any layers to dry. By the time I finished my tenth nail with one color, the first one was mostly dry, and my next color tended not to go in the same place, anyway, so most of each stroke got to dry for two passes before it got touched by another color, really. It looks in these pictures like it's textured, but the top coat really was nicely smooth across it. This was one of those manicures where I kept stopping and just looking at the pretty sparkly nails from time to time!


Monday, March 25, 2013

52-Week Challenge 3/18: Inspired by a Tutorial

Here's my last belated 52-week challenge post, for the week of 3/18. (Or at least the last one sitting in my box as of March 20th! I doubt I'll manage to consistently post promptly from this point on. Anyway, the week of March 18 has a challenge theme of "Inspired by a Tutorial", so after browsing through my Pinterest Nail Art board, I picked Wacky Laki's tutorial on freehand flowers:


Aren't they just gorgeous? I must say, I think a far better recreation job with this manicure than I have when imitating other people's nail art in the past!


Two of the polishes used had literally just come in the post the day I did this manicure. March is my month to receive polishes from my exchange group, so posts for the next month or so are likely to showcase new polishes each time. For this one, I started with a base of two coats Above the Curve - Caty Perriwinkle. It's a beautiful dusty lavender, or perriwinkle to be specific, with a holographic shimmer that doesn't show well in this manicure and in fact isn't obvious in the bottle, but it was a lovely surprise when I swatched it! It's a lighter color than these pictures show, with more gray and a lot less blue in the color than comes across. When I used flash, it came out pale lavender, and when I didn't use flash, it shows darker and more blue. This is the best I could do with my camera and lighting set up (I tried both indoor and out shots.)


I used my standard Milani Whitest White for the stripes (two coats for smooth opacity without brushstrokes) and after that was dry, dotting tools and a detail brush produced the flowers with the base outline color being my new bottle of Above the Curve Wisteria, topped with Whitest White on the small flowers and China Glaze Agent Lavender for the slightly larger ones, with center dots of first Sally Girl Banana and then Sinful Colors All About You.


Monday, August 6, 2012

Where the Green Grass Grows...

I think my favorite manicure these days tend to be ones inspired by something other than nails. I've got a whole board on my Pinterest dedicated to Inspirations for Nail Art. I've also got separate boards for nail art itself, my own nail art (with links to here, so you can keep track of my pretties there or here, whichever is easier for you :), and nail polishes I want to own...though that last one really does tend to predominate to the browns and greens, since those are the polishes that catch my eye the most and make me go "Ooooh I WANT!" I try to actually buy a full spectrum of colors (thank you China Glaze for putting out collections that contain so many colors that I want - Capitol Colors and On Safari - that I give in and buy the whole thing!) but it's pretty much greens and browns that go on my wishlist.

I'm not sure if it's a good thing or a bad thing to write up blog posts when I'm hyper. I think the babble that comes out is more amusing than if I'm writing on a more calm day, but on the other hand, do you guys actually read these things or just look at the pretty pictures?? (Yes, co-worker N, I know you read them, but does anyone else, or am I just making myself giggle here? ;)

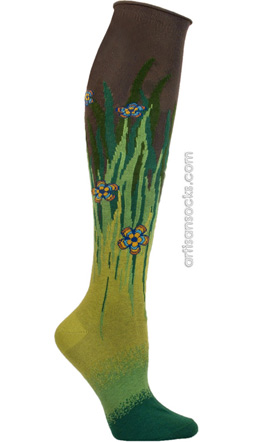
Aaaaanyway, on to what you're actually here for - you know, the nail art? :) As I was saying, I like the manicures I make based on something other than nails, in today's case, a pair of socks. Yes, a pair of socks! I don't actually own this particular pair (though I'd love to!) but I love weird and quirky socks, and so I enjoy perusing www.artisansocks.com for their aMAZing selection of socks! So, this is the pair I wanted to recreate on my nails:


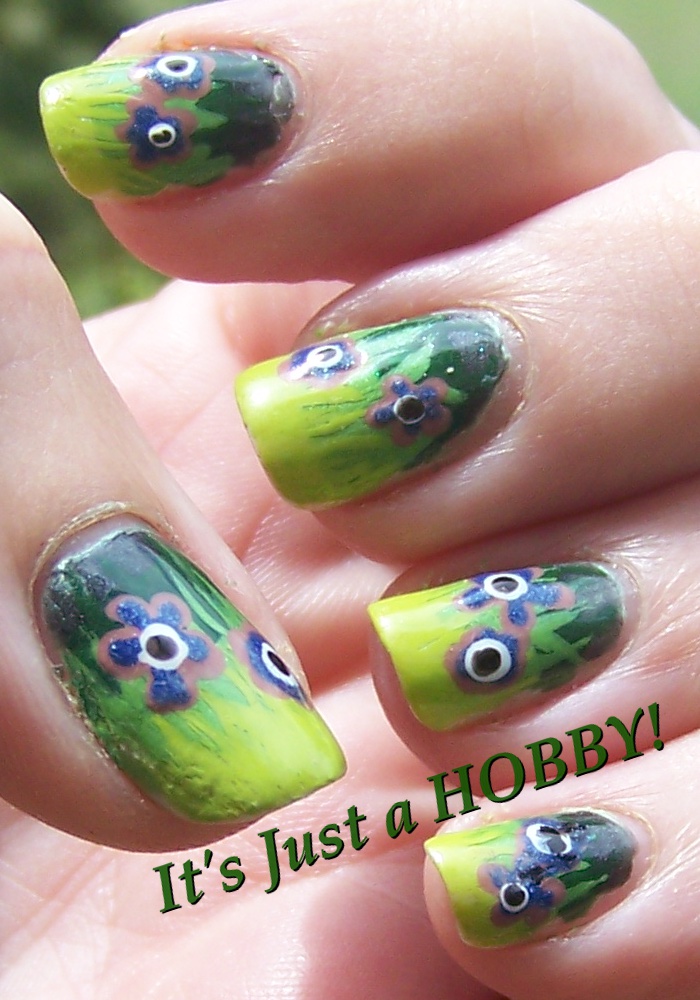
Aren't they adorable? Here's my, hopefully equally adorable, interpretation of them!


I started with a base of Color Trend Ice Sheers Refreshing Pair, which you can't really see in the final manicure, but it made the layering of the lightest green color just the right shade of yellow-green, since I didn't have exactly the right color in my polish paint palette. (I'm tempted to start calling it my Triple-P, but then I'd have to explain it each time I did, which sort of negates the purpose of the nickname... Heh. My brain is weird, have you noticed?)


Onward! I painted horizontal stripes of China Glaze Black Diamond for the grey top stripe, and Nubar Forest, and China Glaze Tree Hugger for the dark and medium greens. Then, starting with the dark green, I painted the taller grass upward into the color above it. Finally, I used Sinful Colors Innocent for the bottom light green grass, and lightly filled it in over the Refreshing Pear. I did try using Innocent as the base color on a test wheel first, but I preferred the color over Refreshing Pear rather than by itself. By itself, the blades of grass up over the Tree Hugger looked very different in shade than the bottom stripe, and it just looked wrong.


Then I used China Glaze Dress Me Up with a dotting tool to make the base color for the flowers, and layered on top of it Sinful Colors Neptune, then a single dot of Sinful Colors Snow Me White, and finally a small dot of NYC Black Lace Creme. I actually only did the flowers on my left (non-dominant) hand, and left my right hand with just the blades of grass. They were both cute! Of course, I was also developing a headache by the time I finished and decided it wasn't worth adding the flowers to the second hand...but really, I did like both versions! That's my story and I'm sticking to it...


Monday, July 23, 2012

Brownstone & Beetle Lace + Bonus Mani

Hello fellow hobbyists and other nail art aficionados! Today you get to look at everybody's hands but mine! :) Well, the first mani is on my BFF V's hands, which are regular guest stars here. The bonus mani, however, is from a first-time guest on my blog, but I'll tell you more about that when we get down there. (Why yes, it is my evil plan to leave you in suspense, why do you ask?)

So, while browsing at Hancock's the other day (though honestly, I was just being a chaffeur for the actual shopper) I decided that I wanted to try doing lace on nails. I've seen others do it, and it looks awesome...but you know what? It's kind of hard to find lace that has small enough details to be worth trying on nails. And I wanted some black, but the black ones were either not tiny enough detail, or too expensive for my post-vacation, pre-payday finances. :P So I found a couple of white choices.

I'll admit to not being terribly happy about this manicure, and not being able to topcoat over the lace (which is why the accent nails got painted over, by the way, because the topcoat soaked in too much and we didn't like the result) meant that they weren't as secure as I would have liked. I thought it would be okay, since when we did a cotton floss manicure (behold, the way waay back machine!) it actually stood up to office work for several days without problems. Alas, this manicure was not so sturdy...though it might have lasted more than half a day if V hadn't accidentally soaked her nails in a kitchen cleaner with ammonia in it while cleaning her office break room...

Well, it looked pretty before then, anyway! We started with two coats of China Glaze Brownstone, and I added a coat of Hard Candy Beetle on the thumb and ring fingers. Then I cut a few little pieces of lace, laid down a layer of topcoat, and stuck them on there. Voila, manicure! Okay, okay, we also managed to get too much topcoat on the ring finger when I was trying to stick down the edges, and it made it look bad, so we painted over the lace with another coat of Beetle. I don't care for the way it looks, personally, and wanted to remove that nail and start over, but V liked it, and since it's her hands...


And now for our bonus manicure! As I said, this is a first-time guest on our blog, and it's likely to be her last time appearance, as well, as it's G, my oldest daughter, and she lives in Kentucky with her dad and other-mom (okay, legally step-mom, but she's been a great mom, no prefix, for my older three kids and she deserves the title.) She was visiting us for a month between her graduation from high school and heading off to the University of Kentucky this fall (with a full ride National Merit Honors scholarship - obligatory proud parent bragging, you know.)  While she enjoyed playing with my nail polish stash while she was here, she limited her manicures to french tips and occasional accent nails...until just before she left! I managed to get the nail art bug to bite her!

I was doing a taped manicure, and she thought the method looked interesting, so she took some and did a basic X-pattern with the tape on her already pink nails, and added purple in two of the four sections resulting. When she was done, she declared it looked like a hazard symbol...and less than an hour later, she was removing her polish, because she'd decided to try a real hazard symbol! She started with a nice coat of Primark Beauty neon yellow, some slightly more complicated taping than her original X, and added a layer of China Glaze Liquid Leather in half the taped sections. She wasn't sure how to go about doing the center of the symbol, so I took a look at what she was going for...

radiation warning symbol

...and pulled out two different sizes of dotting tools. So a large dot of yellow topped with a smaller dot of black later, and she had the following manicure:


Isn't that just awesome for a very first nail art manicure?? It was also the first manicure she sported here that she didn't chip off over the course of the next day. :P She even went so far as to touch it up a bit the next day! And she was looking over various other geeky symbols that she could possibly do on her nails in the future. I showed her the nail art blog, NailNerd.com, and she officially declared me to be the Evil!Mom. She was still browsing that blog a half-hour later...and that evening she discussed with me what she could use for dotting tools, or if she needed to buy some! ::giggle:: I love corrupting the youth of society!


Monday, July 16, 2012

Phoenix Fire

Good morning, fellow hobbyists! My friend V emailed me a ton of phoenix and dragon pictures the other day, hoping to have them appear on a nail (possibly hers ;) sometime in the future. While I was originally thinking making decals, I got quickly uninspired when I started to make them. One of those days, le sigh. But when V came over for our weekly dose of So You Think You Can Dance (which I will admit to watching nearly religiously, but it is the only reality/contest show that I watch.) Anyway, she came by as usual, and also as usual, we started brainstorming what to put on her nails. And the phoenix pictures got pulled out again. Within minutes, I had fixated on this one:


And lo, a manicure was born! I did a few trial nails on my nail wheel, and they came out...less clear and crisp than the original picture, but still awesome to look at. We started with a base of Avon Lucky Penny across all the nails except the ring finger, on which we used NYC Black Lace Creme. I used the Lucky Penny to do the base drawing of the phoenix on the ring fingers, and then added some accent strokes with Sinful Colors All About You and Sally Hansen Celeb City.


After the base color, I added a coat of Seche Vite and then dabbed on loose glitter - a bronze solidly across the tips, like a glitter french tip, and then I gradiated red and gold back from the tip, to make an overall feeling of fire. But honestly, the phoenix was the pièce de résistance! (Why, yes, I did have to look up how to spell that, why do you ask? :)


Now realize, when I drew this on her fingernail, it was all very very teeny-tiny! It was a gorgeous, but abstract, phoenix. Imagine our surprise when, after we took pictures, we looked at these and thought - wow, it looks like I planned for that to look like it's got an eye and a beak and everything! When actually, I just did an outline and then added dabs of gold and silver wherever it looked like it wouldn't overwhelm it! ::giggle::

I also made V stop by my office the next day so we could get some picture in the sunshine. We had a bit more difficulty with positioning, of course, since we had to angle for the sun instead of my bathroom with the three light sources set up, but just look at that glitter sparkle and the phoenix is on fire! Totally worth the effort. :)


Monday, July 2, 2012

Purple Paisleys and Flowers

Good morning, fellow hobbyists! My oldest daughter is visiting me for a month this summer before she heads off to the University of Kentucky this fall (where she lives with her dad, stepmom, two brothers and two half-sisters) so in expectation of having an irregular nail-painting schedule, I've started scheduling my blog entries to post on Monday and Thursday mornings. That way I can be sure to have a regular blog flow (ooh that sounded less gross before I re-read it! ::evil grin::) even while I'll be out of town for a full week during this month. You might remember that my friend V has been having some job interviews lately. Recently, she got called back for a second interview for one of the jobs she thinks would be a really good fit for her. So as usual, she called for an "appointment" at her favorite salon - my living room! She brought the shirt she was planning to wear, and it has this wide paisley and flower pattern all across the bottom of it:
I seem to have a hard time catching color on fabric well. I've had a lot of practice at taking pictures of nails by now, but taking pictures of her clothing is a different job entirely! ^_^ I don't have quite that color of green in my stash (and my oldest daughter, who is visiting me for a month before she heads off to her first year of college this fall, says that the number of polishes I already have is "NOT just a hobby, Mom. That's an obsession." Until I pointed out to her the number of polishes actual collectors have. I just have a paint palette, and clearly it's not a complete palette when I can't match this color. Anyway, of the greens I have, I thought Nubar Reclaim would look the best with it. I wish I could've got picture of this manicure in the sunlight, to show how awesome the Reclaim holoness looks in the sun, but obviously we did her nails at night. :P
I used a Jean-Michelle polish...I think the name is Perle, but since I don't have any other polishes of this brand, I can't compare to see if where that word is on other bottles is actually a color name. Anyway, I used Perle for the beige, NYC Purple Pizazz Frost, and Sinful Colors Daddy's Girl to give a little sparkle to the purple dots and flowers.


I think I might have trouble deciding what to do on V's nails the next time she wants a mani and doesn't have a job interview! Hehehehe...

Thursday, June 28, 2012

First Snowfall in Minnesota

No, fellow hobbyists, I'm not in Minnesota, and it's not snowing, there OR here in Arkansas in July. But I saw this picture on Pinterest, labelled "First Snowfall, Duluth, Minnesota," and the colors were so striking that I had to drop what I had planned for my nails that very night and do my best at recreating it.


I guess I did a decent job at it, as some of my co-workers this morning have said they think it might be their favorite manicure that I've done thus far. It's a rather Monet interpretation...but I do love the way the colors came out! I used a base of Sinful Colors Snow Me White (how appropriate!) and then added a layer of China Glaze Luxe and Lush to mimic the shine and sparkle of sunlight on snow. I then used the saran wrap technique of blotting on the leaves, both in the trees and on the ground, using (in this order) Primark Beauty Neon Orange, Sinful Colors Courtney Orange, and NYC Broadway Burgundy Frost. A thin striping brush with Pure Ice Magic produced the tree trunks, and voila! An early snowfall on a brilliant fall landscape. I did dabb a bit more Courtney Orange over some of the nails where the tree trunks seemed too crisp.


Given the few numbers of people I have following my blog, I haven't asked a whole lot of questions of you guys, and I figure most of you are other nail art people. But if any of you ever want me to generate a tutorial for anything you see me do, just let me know. In the short-term, I'll point you toward where I learned it from, but I'll take a note and create a tutorial for anything you ask for just as soon as I can. The thing is that when I want to learn how to do something, Google is my friend, and I search out three or four different tutorials for it and then amalgamate them all in my head down to whatever works best for me. However, I do realize that some of you either might not know where to look, or just want to ask me, and I thought I'd put it out there that anybody coming by can ask! I have to remind myself not to assume that just because I read a lot of nail art blogs doesn't mean everybody does...and sometimes seeing all the experts out there I forget that one of the reasons I started this blog wasn't just to keep a record of my nail art, but also to show a progression of skill from beginner to (hopefully, someday!) an advanced skill level...and to help other newbies like myself be less intimidated by the amazeballs artwork out there and go, "Hey, if she can do that, maybe I can, too!"

So yeah, if maybe you're less intimidated asking me how I did something than you would be asking one of the awe-inspiring nail artists out there, please do! And if there's a technique out there you've seen going around and you'd like to see me tackle it and maybe show you an "Idiot's Guide to Nail Art" version, I'd love to give it a try.


Friday, June 22, 2012

Fashion Fuschia

Okay, these are more pink and purple than fuschia, but the alliteration was too cute to pass up! :)

My friend V had another job interview, so she came by the night before for a manicure to match her clothes. I tried taking a picture of this fabric in a half-dozen different lighting situations and couldn't get the color to come out accurately, but this lighting came pretty close.


We hit my swatch sticks to match up colors and we got the closest match with China Glaze Reggae to Riches and L'Oreal Violet. I experimented with a few different patterns on a swatching wheel before we decided what to go with. I tried using a straw to get the half-circles but while I would have liked the result for a playful manicure, it didn't really come out looking professional, so we decided against it for a job interview. I also tried to do some freehand curves, and that just was a total nail fail. We decided it was better to match the geometric starkness of the stripes rather than try to replicate the curves, so we went with a striping tape mani.

I started with a base coat of Milani Whitest White, then laid down some striping tape on a diagonal. L'Oreal Violet on the cuticle end of the nail, China Glaze Reggae to Riches on the tip, and China Glaze Liquid Leather in a stripe between the striping tape strips. Macro pictures are not forgiving to precision nail art, but it looked pretty darned good in real life!


Wednesday, June 6, 2012

Blue and Brown Somethings...

What do you see when you look at these nails?

The first co-worker I showed them to this morning said they looked like waterfalls, so I asked all of my nail art following co-workers what they saw when they looked at them. The next person said they looked like pillar rock formations, though she wasn't sure what the white dots would be. The third said they were abstract, but gorgeous.
Now, maybe it's because I spend so much of my time staring at nail art blogs, but when I see these,

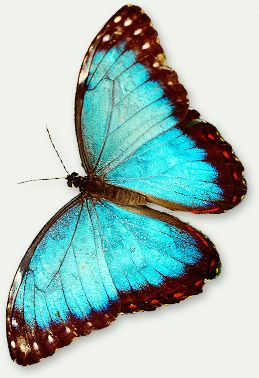
 they automatically make me think of these:
Which, of course, is the picture I based this nail art on, though I didn't come anywhere near that vibrant shade of blue. I did my best, though, by laying Sinful Colors Cinderella over a base of Sally Hansen Blue Me Away! The combination actually is a bit lighter than it looks in these pictures. I'm not quite sure how taking these pictures in the bright sunlight actually made the colors look darker than they really are, but I'm not an expert on the physics of light, cameras, and color recognition. I just "see pretty, aim camera, click button!" (Okay, I'm a bit better than that - I'm capable of hitting the macro button, turning off the flash, and getting the autofocus to focus correctly...most of the time. :)

Over the beautiful blue, I used China Glaze Unplugged and then layered over it some Pure Ice Magic to get as close to that gorgeous brown shade as I could. I also attempted to give it that feathered look up near the edge of the brown, but I'm not sure if I succeeded or just made it look messy. A dotting tool and Milani Whitest White and poof! we have spots. And for once I managed to get my cuticles all nice and moisturized before taking the pictures! :) Well, mostly, anyway. :P Now if I could just figure out how to pose my fingers so they look graceful, despite them not being straight. You wouldn't believe the difficult in lining up your fingernails for a picture when my longest finger is almost twice the length of my shortest one (no, I'm not counting the thumb!) and my fingers themselves all curve slightly inward like I've been wearing pointy-toed shoes on my hands for too long! It's also why you'll hardly ever see shots with me holding a polish bottle. It's hard enough to line those nails up when I only have to worry about positioning my hand. It's 1,000 times harder trying to gracefully pose my fingers on an odd shape of varying diameter. I still try from time to time, though, because they look so coooool on other people's blogs. :) I need to make a silliness crown so I can call myself the Queen of Silly.