Showing posts with label plastic wrap. Show all posts

Tuesday, September 3, 2013

Quilted Rainbow

One of my co-workers is a quilting fanatic. I could almost say she makes more quilts than I do manicures, but since it only takes me a few hours to do a manicure, that would be a bit of an exaggeration. :) I've been trying to think of a way to do quilt blocks on my nails for ages, especially since she occasionally looks at my nails and says, "Oooh that looks like a quilt!" Well, here are my quilt block nails for LL!


Each nail has two colors on it, done with the plastic wrap technique. The thumb has China Glaze Innocence and Cranberry Splash. Index finger has Sinful Colors Unicorn and Orange Cream. The middle finger is Wet N Wild Stand the Test of Lime and Zoya Logan. The ring pinwheels have a base of Sinful Colors Cinderella and Neptune, while the pinky fingers have Rimmel I Lilac You and the sparkly lavender end of Revlon Moonstruck. I used Sinful Shine Dark Room along with a little polish thinner to draw the lines and blocks with a tiiiiny nail art brush, and voila! Quilt blocks on my nails!

And now for the picture spam!


Thursday, August 1, 2013

Mossy Jasper Nails

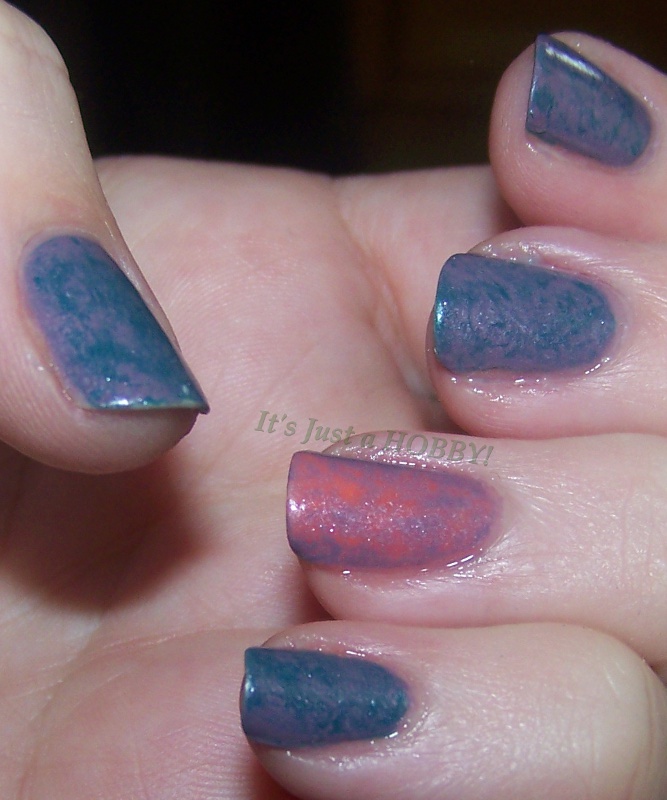
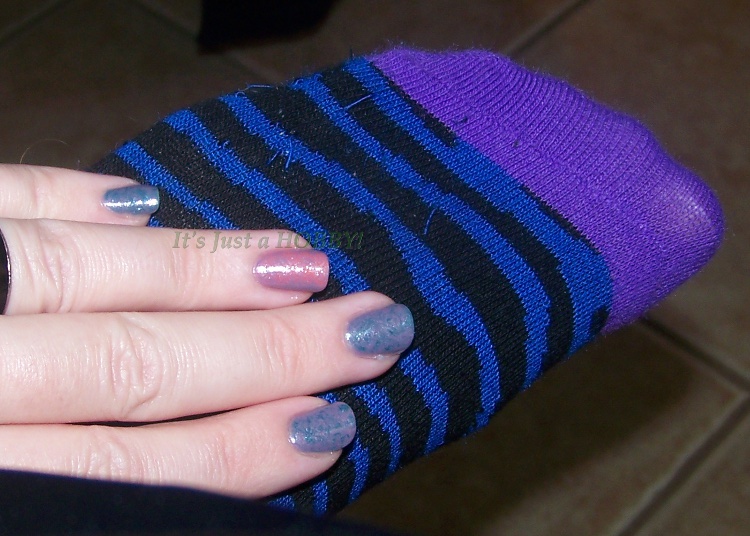
I really can't leave a new nail polish sitting untried on my desk for very long. They caaaallll to me! So I was lazy one day, but I wanted to show off the gorgeousness that was my new Zoya Logan. I also had the idea that I wanted to do a gemstone manicure, and after browsing around different types of gemstones, I wanted to see if I could do a rendition of moss jasper, and this is what I ended up with.


I started with a base of Avon Absinthe, and after that was fully dried I put on a thick coat of Zoya Logan, and used plastic wrap to sponge some of the color back off.


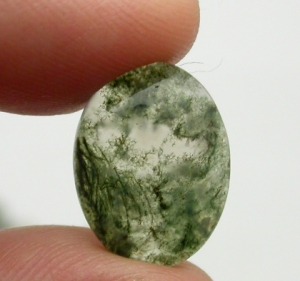
Here are a few pictures I found googling "moss jasper" or "moss agate" to give you an idea of the look I was going for, so you can decide if I nailed it or not!


And now for the picture spam!


Wednesday, July 10, 2013

Spring Bluebonnets in Summer

This manicure was one of those rare, spectacular times, when I was not using anyone else's manicure as inspiration, and yet my nails managed to come out exactly as I was imagining it when I designed it!


I started out with Milani Whitest White as a base, and then used the plastic wrap method to marble on first Color Club Take Me To Your Chateau and then Avon Vintage Blue. It came out, as I said, exactly as I had mentally pictured - that beautiful bright but pale blue of the sky on a crisp spring day with a hint of white to imply wispy white clouds.


I used a detail brush to add stems of Sinful Colors Exotic Green, and then my smallest dotting tool with China Glaze Frostbite for the bluebonnet flowers. I stippled the flowers quite thoroughly rather than just putting solid dots of the lacquer, in order to let some of that white/blue from the polish underneath come through, to add texture and depth to the flowers.


I really was blown away by how these nails came out just the way I wanted them to. While I often draw out a design that I want on paper, I only paint an actual practice nail maybe a third of the time, and this wasn't one of them. I just had an idea and went to town on my fingernails, and I was so excited to watch the picture in my mind take shape on my tiny little canvases!


Thursday, May 30, 2013

May Tri-Polish Challenge: Day 4

The final day of May's Tri-Polish Challenge has arrived! This month's Tri-Polish colors are blue, grey, and red. My polish choices for the month are Sinful Shine Break Away, Sinful Shine Devious, and China Glaze Elephant Walk. The requirements for this challenge from Crumpet's Nail Tarts are as follows:
  • Three colors are specified for each month, for use in four manicures, and the participant must choose a single polish for each color to use throughout the four manicures.
  • All four manicures must use at least two of the three polishes, and at least one mani must contain all three.
  • The only other colors which can be used are white, black, gold, silver, or a clear-based glitter.
  • Manicures are to be posted the Tuesday and Thursday of the last two weeks of the month.
I tend to use all three of the polishes on most of my manicures for this challenge, but today's only used Devious and Break Away. 


I started with three coats of Sinful Colors All About You, then one finger at a time I put a thick coat of Devious (except for the ring fingers, which of course used Break Away) and then daubed it off with some crinkled plastic wrap. 


Usually I prefer to take pictures of my manicures in natural light, but I had to use flash to even get a glimpse of how the gold really shines on these nails. It looks like gold foil! Even with that, these pictures really don't capture it in the slightest, but I'm just not a good enough photographer to know what I need to do to show it off better.


 I have to say, though, this was the worst manicure for clean-up ever. Even water marbling is easier to do clean-up on than glitter with this red. Devious has a consistency of a really thick jelly, and when you try to do clean-up on it, it's like trying to get blood out of cloth: it gets lighter and lighter but it's visibly still there. Add the stubbornness of the random fleck of glitter here and there and honestly? I gave up on clean-up well before I was satisfied. It was that annoying. :P But look at the pretties! Sooo worth it!


Now let's see the last batch of beauties that we all came up with for red, blue, and grey this month!

Friday, April 5, 2013

The Cult of Plastic Wrap

March was my month to receive from my nail exchange buddies, and as anyone who knows me can tell you, I do not have many untried polishes in my stash. Ever. Because those brand-new polishes sit on my desk rather than getting put away on the shelf until they go on my fingers. ^_^ So when I received a package that contained my very first Cult Nails polishes? All four (three colors and a quick-dry top coat) went onto my nails that very evening!


I started with two coats of Let Me Fly on all my nails except the ring fingers. I used Scandalous on those. And then I cut up a strip of plastic wrap so I had ten little squares ready to go. One finger at a time, I put a generous layer of My Kind of Cool Aid on a nail, balled up a piece of plastic wrap, and daubed it on the wet nail. I have had a hard time getting this all-over texture from plastic wrap before, but I think I've finally got the hang of it! Also, I have to comment on this quick-dry top coat. I have two other top coats that are considered quick-dry: Seche Vite and one from Sinful Colors. However, I have to say, this is the FIRST top coat where I can actually feel it causing evaporation! Seriously, it makes the tips of my fingers feel cold for a minute! I still love my Seche Vite because I love the shine and the thick, lacquer-like feel of it. But lately I've started using the Cult Nails top coat first, and then topping it with my SV for the final look.


My exchange buddies also know that I like weird patterned socks. It's kind of my thing - I actually do wear these puppies to work, whether I'm wearing boots or shoes where the socks show. I love being quirky! So far every package I've got from my exchangers, that didn't get shipped straight from the polish company, has contained cool socks! See my cool socks?


More pretty nail pics, and I'll shut up now! :)


Friday, October 12, 2012

"This is Halloween" Day 4 - Jack-o-Lanterns


Today marks the next installment of the "This Is Halloween" Nail Art Challenge from Lacquer Dreams! Thanks to her for coming up with a great list of challenge themes, and enjoy clicking through the links below to see everyone else's interpretation...and then add your own! :)

Without further ado, here are my Jack O'Lanterns!


Wait, what? Those are just pumpkins? Well, of course they are! The Jacks are on the other hand!


Yeah, I know, I won't quit my day job, I promise. I'm definitely not the comedian/ne in the family. Which is why my hobby is nail art, not jokes!

Hmm. Maybe I shouldn't write blog posts when I'm feeling silly. Ah, well, you're not reading this anyway - you're just here for the pretty pictures!


I started off with two coats of Nubar Forest. After waiting for that to thoroughly dry, I put a thick coat of Avon Absinthe, one finger at a time, and then used scrunched up plastic wrap (also known as cling film in other parts of the world, I believe) to dob off some of the Absinthe. I think the result made for a nice mossy or green grass background.


For the pumpkins I started with Primark Beauty neon orange, and then once that was dry I drew lines on them in China Glaze Riveting alternating with Sinful Colors This Is It. I added some stems in OPI Suzi Loves Cowboys and then added thin lines of Absinthe on them...I think that was a mistake, and I should've used another shade of brown, because the stems just don't show up well against the green background. Live and learn!

I used China Glaze Liquid Leather and a tiiiiny detail brush for the Jack O'Lantern faces, and I think I need to learn to use thinner on my palette when drawing tiny details - I can't for the life of me get my lines as thin on my nails as they are on the design in my head. :P


And Brianna wanted to join in the party this week! This is nearly 100% her work - she painted her nails (including base coat, since she asked me if she should use base and top coat and I told her that depended on whether she wanted them to last longer than overnight, and she decided that she did) and drew the Jack O'Lanterns on her left hand (she's right-dominant). I only drew the Jack O'Lanterns on her right hand. Didn't she do a great job?!


Now, enjoy all the pretties listed below!