Welcome to my hobby. It's not an obsession, it's not an addiction, but it IS quite fun! I don't take it too seriously, and neither should you. ^_~
Wednesday, July 18, 2012
China Glaze On Safari Giveaway!
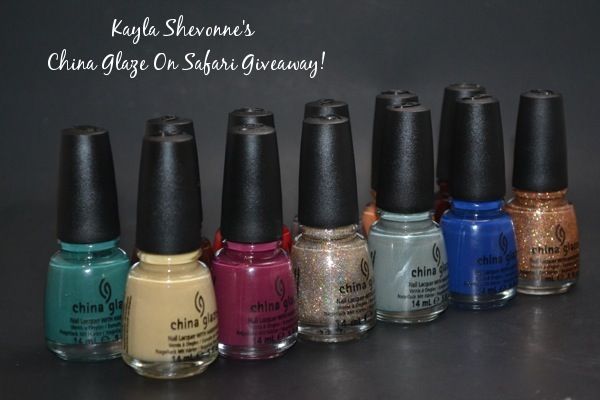
Kayla Shevonne, of Nails by Kayla Shevonne, is giving away the entire China Glaze On Safari Collection to one very lucky winner! I've definitely got this collection on my list of must-gets, though it's currently more of a Christmas-gift-to-myself plan than anything else.
As always, I don't follow blogs just to enter giveaways. I'll go check out a blog if I see a giveaway, sure, but I'll only follow them if I actually like what they have on their blog. Good pictures, good nail art, good humor, or the perfect trifecta of all three, but there's always a reason why I follow a blog. Kayla has at least two out of the three - GREAT pictures, pretty nail art that is frequently inspirational for my own, and the added bonus of great swatching (though I don't really follow a blog if it's only swatching, I do appreciate seeing swatch posts in a blog that already has the other stuff I'm looking for) - and I was already following her blog before she posted this giveaway. I'm happy to send nail blog readers her way!
Monday, July 16, 2012
Phoenix Fire
Good morning, fellow hobbyists! My friend V emailed me a ton of phoenix and dragon pictures the other day, hoping to have them appear on a nail (possibly hers ;) sometime in the future. While I was originally thinking making decals, I got quickly uninspired when I started to make them. One of those days, le sigh. But when V came over for our weekly dose of So You Think You Can Dance (which I will admit to watching nearly religiously, but it is the only reality/contest show that I watch.) Anyway, she came by as usual, and also as usual, we started brainstorming what to put on her nails. And the phoenix pictures got pulled out again. Within minutes, I had fixated on this one:
And lo, a manicure was born! I did a few trial nails on my nail wheel, and they came out...less clear and crisp than the original picture, but still awesome to look at. We started with a base of Avon Lucky Penny across all the nails except the ring finger, on which we used NYC Black Lace Creme. I used the Lucky Penny to do the base drawing of the phoenix on the ring fingers, and then added some accent strokes with Sinful Colors All About You and Sally Hansen Celeb City.
After the base color, I added a coat of Seche Vite and then dabbed on loose glitter - a bronze solidly across the tips, like a glitter french tip, and then I gradiated red and gold back from the tip, to make an overall feeling of fire. But honestly, the phoenix was the pièce de résistance! (Why, yes, I did have to look up how to spell that, why do you ask? :)
Now realize, when I drew this on her fingernail, it was all very very teeny-tiny! It was a gorgeous, but abstract, phoenix. Imagine our surprise when, after we took pictures, we looked at these and thought - wow, it looks like I planned for that to look like it's got an eye and a beak and everything! When actually, I just did an outline and then added dabs of gold and silver wherever it looked like it wouldn't overwhelm it! ::giggle::
I also made V stop by my office the next day so we could get some picture in the sunshine. We had a bit more difficulty with positioning, of course, since we had to angle for the sun instead of my bathroom with the three light sources set up, but just look at that glitter sparkle and the phoenix is on fire! Totally worth the effort. :)
And lo, a manicure was born! I did a few trial nails on my nail wheel, and they came out...less clear and crisp than the original picture, but still awesome to look at. We started with a base of Avon Lucky Penny across all the nails except the ring finger, on which we used NYC Black Lace Creme. I used the Lucky Penny to do the base drawing of the phoenix on the ring fingers, and then added some accent strokes with Sinful Colors All About You and Sally Hansen Celeb City.
After the base color, I added a coat of Seche Vite and then dabbed on loose glitter - a bronze solidly across the tips, like a glitter french tip, and then I gradiated red and gold back from the tip, to make an overall feeling of fire. But honestly, the phoenix was the pièce de résistance! (Why, yes, I did have to look up how to spell that, why do you ask? :)
Now realize, when I drew this on her fingernail, it was all very very teeny-tiny! It was a gorgeous, but abstract, phoenix. Imagine our surprise when, after we took pictures, we looked at these and thought - wow, it looks like I planned for that to look like it's got an eye and a beak and everything! When actually, I just did an outline and then added dabs of gold and silver wherever it looked like it wouldn't overwhelm it! ::giggle::
I also made V stop by my office the next day so we could get some picture in the sunshine. We had a bit more difficulty with positioning, of course, since we had to angle for the sun instead of my bathroom with the three light sources set up, but just look at that glitter sparkle and the phoenix is on fire! Totally worth the effort. :)
Friday, July 13, 2012
Week 28: Gradient
Welcome to my little corner of hobbyland. As you probably know, I'm following a Year's Challenge that I found over on the blog I'm Still Thinking... This week's theme is Gradient, so I asked my visiting daughter what color I should use. She said red, so red it is!
I started with a base white coat so the colors would cover better, then I put a drop each of China Glaze Brownstone, Rimmel Burgundy Flirt, and Avon Ruby Slipper next to each other on my paint palette (otherwise known as the plastic lid I stole out of the kitchen ages ago and won't give back. ;) Using a fan brush, I picked up all three colors together, and painted them across my nail as one. If you use a few strokes, it blends them together seamlessly. It's my favorite method for making gradients, because the obvious lines between colors that even sponging gives you kind of irks me. Not that sponging doesn't have its place, and it looks fabulous on other people, but on my own nails, I will overdo it to the point of obsession trying to make the change gradual. So even though it's messier, I will use a fan brush almost every time. :)
Of course, I obviously didn't leave it there! I used a striping brush and Sinful Colors All About You to add some curving stripes, and then added a rhinestone in the middle. Neither the Gryffindor look nor the fact that it looks kind of like a wrapped present were intentional! As you can see, I didn't get the pictures taken until after I'd started to have some tip wear, but I have to admit that sometimes I'm just plain lazy! I also don't have good clean-up on these because 1) I'm out of acetone, and 2) cleaning up red even with acetone is a job and a half, and I just couldn't get it done well with polish remover! And I may love sharing my nail art fabs and flops with you guys, but I just didn't feel like spending an hour cleaning up a manicure that only took a half-hour to put on in the first place, when it really only looked bad in the close up pictures. ;P
I started with a base white coat so the colors would cover better, then I put a drop each of China Glaze Brownstone, Rimmel Burgundy Flirt, and Avon Ruby Slipper next to each other on my paint palette (otherwise known as the plastic lid I stole out of the kitchen ages ago and won't give back. ;) Using a fan brush, I picked up all three colors together, and painted them across my nail as one. If you use a few strokes, it blends them together seamlessly. It's my favorite method for making gradients, because the obvious lines between colors that even sponging gives you kind of irks me. Not that sponging doesn't have its place, and it looks fabulous on other people, but on my own nails, I will overdo it to the point of obsession trying to make the change gradual. So even though it's messier, I will use a fan brush almost every time. :)
Of course, I obviously didn't leave it there! I used a striping brush and Sinful Colors All About You to add some curving stripes, and then added a rhinestone in the middle. Neither the Gryffindor look nor the fact that it looks kind of like a wrapped present were intentional! As you can see, I didn't get the pictures taken until after I'd started to have some tip wear, but I have to admit that sometimes I'm just plain lazy! I also don't have good clean-up on these because 1) I'm out of acetone, and 2) cleaning up red even with acetone is a job and a half, and I just couldn't get it done well with polish remover! And I may love sharing my nail art fabs and flops with you guys, but I just didn't feel like spending an hour cleaning up a manicure that only took a half-hour to put on in the first place, when it really only looked bad in the close up pictures. ;P
Thursday, July 12, 2012
Holly and Polish China Glaze On Safari Giveaway!!
Yep, you read that right. Holly and Polish has been around for a year, and to celebrate, she's giving away one set of the entire On Safari collection from China Glaze!
Holly and Polish has great swatching pictures, lots of fun nail art to ogle over, and I like reading her reviews. Even if you initially go for the giveaway, you should spend some time browsing her archives. Enjoy! (I would say good luck, but *I* want those polishes for myself! ;)
Monday, July 9, 2012
Vacation Nail Haul & Mani
I just got back this weekend from a week's vacation - my first actual, full vacation as an adult! (Yes, I'm almost 42 and I've never taken a vacation. I've had days off, lots of maternity leave, but no *vacation* where you take a full week off work and actually go somewhere as a family.) Well, my newly-adult daughter, Grace, is staying with us for a month this summer, between graduating high school and heading off to University this fall. So what better time? We spent three days visiting my dad and sister in KC, then headed down to Branson for a day and a half at Silver Dollar City, and then a day at the beach on Table Rock Lake. Despite the heat wave (thank goodness for water rides!) we managed to keep hydrated and thoroughly enjoy ourselves.
While we were at my Dad's place, one of my sisters decided to get rid of the last of her polish stash, so Grace and I split it between us. Here's my half of the haul! ::insert evil laugh here - Bwahahahaha!::
From left to right, that's Cover Girl Electric Blue, Sally Hansen Chrome in Gilded Pearl, Opal, and Black Pearl, then Avon Nailwear Pro+ (the glitters) and Nailwear Pro (the non-glitters) in Ruby Slippers, Lucky Penny, Absinthe, Vintage Blue, and Jade.
I also gathered Avon Mosaic Effects (otherwise known as crackle, duh!) in black and white, and two Avon Mirror Shines in Peace Ice and...well, the label says "Polish" but I don't know why they'd name a polish "Polish". WhatEVAR, moving on! Color Trend Refreshing Pear and some unnamed mini Lisa Frank Nail Magic. Is pretty, though!
And now I need to buy more swatching sticks, can you believe it? I think I have two or three left. Maaaaybe four. But I have 141 polishes on my shelf! (I bought 150 swatching sticks, and of course a few were cracked/broken.)
Last, but not least, lots of stickers/rhinestones/pretty things to stick on my nails!
I am sad to say that my right-hand middle finger was a casualty of war, though. It broke off at the quick while we were camping. Bad Ro for having nude nails for two days! If I'd taken the time to put a coat or two of basecoat on them, at least, it probably wouldn't have happened. But we had fun-filled days and we were TAHRED! (that's Texan for plumb worn out, by the way) when we got back to camp each night.
I did put on a basic manicure once it had broken, though, to ensure no more nails would go the way of my poor middle nubbin. I put on a couple coats of my wonderful Haken Nail Magic, then a couple of coats of my brand-new gifted polish, Avon Ruby Slipper, and then I added a gradient of Windestine Star Bright to the top half of my nails, and added a full accent nail of Star Light to my ring fingers.
At least I stayed with the patriotic theme for the week, yeah? ^_^ I mean, look, there's stars and bars right on my nails!
Would anyone like to share their tips or techniques for taking care of their nails while away on vacation? I'd love to hear them!
Labels:
Avon,
Cover Girl,
glitter,
Haul,
indie polish,
Sally Hansen,
Windestine
Wednesday, July 4, 2012
Week 27 - July 4th Fireworks!
It's Week 27 on our year's challenge list, and for Americans, that means Independence Day nails! I chose to do fireworks on my nails...and I ended up with a total of 13 different glitter polishes on my nails! THIRTEEN! *grin* Plus a few loose glitters. It's going to be a foil-method removal, that's for sure. I started with a base of China Glaze Smoke and Ashes, for that tiny bit of sparkle in a night sky. Then I just pulled out quite a few of my glitter polishes, and just picked whichever one I thought would look good with whichever firework I was producing, one nail at a time. :) I'm not sure which polishes are one which nails, honestly, though I can try to work it out if you ask. In no particular order, this is the list of polishes which were sitting on my work surface when I was done: Wet 'N Wild Kaleidoscope, NYC Starry Silver Glitter, Sally Hansen Celeb City, CND Gold Shimmer, Essie A Cut Above and Set in Stones, Sinful Colors Snow Me White and All About You, Pure Ice Strapless, Zoya Karina, China Glaze Electrify, Windestine Rainforest and Star Light, and KISS Nail Art in Pink Glitter and Gold Glitter. And now, on to the PICTURES! I've got a lot of them, in different angles and shots, so I'll use small pictures here. Click on them for the good sizes, of course. :)
Monday, July 2, 2012
Purple Paisleys and Flowers
Good morning, fellow hobbyists! My oldest daughter is visiting me for a month this summer before she heads off to the University of Kentucky this fall (where she lives with her dad, stepmom, two brothers and two half-sisters) so in expectation of having an irregular nail-painting schedule, I've started scheduling my blog entries to post on Monday and Thursday mornings. That way I can be sure to have a regular blog flow (ooh that sounded less gross before I re-read it! ::evil grin::) even while I'll be out of town for a full week during this month.
You might remember that my friend V has been having some job interviews lately. Recently, she got called back for a second interview for one of the jobs she thinks would be a really good fit for her. So as usual, she called for an "appointment" at her favorite salon - my living room! She brought the shirt she was planning to wear, and it has this wide paisley and flower pattern all across the bottom of it:
I seem to have a hard time catching color on fabric well. I've had a lot of practice at taking pictures of nails by now, but taking pictures of her clothing is a different job entirely! ^_^ I don't have quite that color of green in my stash (and my oldest daughter, who is visiting me for a month before she heads off to her first year of college this fall, says that the number of polishes I already have is "NOT just a hobby, Mom. That's an obsession." Until I pointed out to her the number of polishes actual collectors have. I just have a paint palette, and clearly it's not a complete palette when I can't match this color. Anyway, of the greens I have, I thought Nubar Reclaim would look the best with it. I wish I could've got picture of this manicure in the sunlight, to show how awesome the Reclaim holoness looks in the sun, but obviously we did her nails at night. :P
I used a Jean-Michelle polish...I think the name is Perle, but since I don't have any other polishes of this brand, I can't compare to see if where that word is on other bottles is actually a color name. Anyway, I used Perle for the beige, NYC Purple Pizazz Frost, and Sinful Colors Daddy's Girl to give a little sparkle to the purple dots and flowers.
I think I might have trouble deciding what to do on V's nails the next time she wants a mani and doesn't have a job interview! Hehehehe...
I seem to have a hard time catching color on fabric well. I've had a lot of practice at taking pictures of nails by now, but taking pictures of her clothing is a different job entirely! ^_^ I don't have quite that color of green in my stash (and my oldest daughter, who is visiting me for a month before she heads off to her first year of college this fall, says that the number of polishes I already have is "NOT just a hobby, Mom. That's an obsession." Until I pointed out to her the number of polishes actual collectors have. I just have a paint palette, and clearly it's not a complete palette when I can't match this color. Anyway, of the greens I have, I thought Nubar Reclaim would look the best with it. I wish I could've got picture of this manicure in the sunlight, to show how awesome the Reclaim holoness looks in the sun, but obviously we did her nails at night. :P
I used a Jean-Michelle polish...I think the name is Perle, but since I don't have any other polishes of this brand, I can't compare to see if where that word is on other bottles is actually a color name. Anyway, I used Perle for the beige, NYC Purple Pizazz Frost, and Sinful Colors Daddy's Girl to give a little sparkle to the purple dots and flowers.
I think I might have trouble deciding what to do on V's nails the next time she wants a mani and doesn't have a job interview! Hehehehe...
Subscribe to:
Posts (Atom)


