Wednesday, August 15, 2012

Show Some School Spirit!

It's that time of year on college campuses across America - the horde is descending upon us! Otherwise known as the students returning, of course. :) In fact, my oldest daughter is moving in to her very own dorm room at University of Kentucky this week. We did, however, have some fun-spirited arguments while she was visiting me this summer, regarding her chosen institution of higher learning versus the one I work at. Heh...

But on to the nails! It was Orientation Day for new students in V's department this week, and all the staff were encouraged to wear red to show off our school pride. (Cardinal Red is the University of Arkansas school color, after all!) So, in the same spirit, we decided to show off her school spirit on her nails!

Please forgive the quality of the pictures today - it is a very busy time at work for us, and the sun refused to cooperate to shine upon her nails when we were taking them, so we resorted to flash. Neither picture is quite color-accurate, as the reality is somewhere in between the two.


We started with a base of China Glaze Adventure Red-y from our newly acquired On Safari Collection. We added french tips in NYC Broadway Burgundy Frost (and a full nail coverage on the ring finger for accent), and then drew a line between the two in Milani Whitest White. I thought about drawing some sort of design on the accent finger...but then I decided that writing UA would go best with the rest of the manicure. Not that I'm all that good at printing letters in nail polish...yet!


As usual, red is a bitc-a to clean up, leaving cuticles to look like they're inflamed for some reason, but thankfully it's far less noticeable in real life. Go Hogs!

Monday, August 13, 2012

Marbled Ice

V loved her last water marble so much that she wanted to do it again. And this time, she wanted to try it for herself! Since water marbling is one nail art technique that I do that doesn't require steady hands, she thought she might be able to do it on her own this time. But of course, she wasn't going to attempt her first solo nail art without a spotter, so she came over to my nail salon ::cough-living-room-cough:: to attempt her first masterpiece where I could help if she got stuck. (Not to mention that all the nail polish is at my house, anyway. ;)

Like much of the nail art I do, she started with a picture for inspiration. V is a big, big anime fan. Not that I've got anything against sitting down for an anime marathon, myself, but I'd just as soon read fanfiction based on the anime as watch it, myself. (It doesn't get much better than a well-written Harry Potter/Gundam Wing crossover, in my opinion...and yes, I know I'm a geek, and proud of it! :) So here's the picture V was going off of: 


Don't ask me who the characters are, as it's not an anime that I watch, and I don't try to keep track of what V's watching these days. She'll spout off a dozen Japanese names and tell me all about them like I know which one's which. The silly baka knows the only two anime I've ever watched with enough interest to remember who's who were Slayers and Gundam Wing.

So, blue, lavender, and white, with an icy look/feel is what she was going for. I pulled out Sinful Colors Snow Me White, China Glaze Agent Lavender, and Cover Girl Electric Blue for her water marbling. Most of her nails came out excellent, though a few of them weren't what she was going for, so she described to me what she wanted - lines, rather than flowers or stars - so I showed her how to manipulate the colors to get that effect, and then I helped her with the last few, but most of these nails are actually 100% her work.


To top off that icy look, we added a layer of China Glaze Luxe and Lush over the top. It added just enough flakes to look like shards of ice across her nails, and we declared this manicure experiment a complete success!


Friday, August 10, 2012

Week 32: Needle Marble

Yet another week has gone by, and that means another theme for the Year's Challenge. Head over to Jenna Froggy's page to check out the full schedule and see a list of other blogs participating, but for now, this week's theme is Needle Marble. If you're not already aware, needle marble is a technique where you put drops of different colors of polish on your nail, and use a sharp instrument - toothpick, tiny dotting tool, or needle (hence the name, duh ;) - to draw swirls directly on your nail. I don't remember who it was, but the blogger I first saw using this technique linked to a Robin Moses tutorial for how to do it, so I'll give credit for where I learned how to do this where it's due. You can find the video at the bottom of this post. :)

Without further ado, here's what I came up with!


I had an inspiration for this manicure. I don't know how well I captured it, but I was basing it on a particular painting, Rebirth by Oni Hazarian, which is available in multiple types of prints from Fine Art America. I love browsing their website for inspiration, which you can tell from browsing my "Inspirations for Nail Art" pinterest board. ^_^


To do my best with how this beauty inspired me, I used a base of China Glaze Smoke and Ashes. The various swirls were done with Primark Beauty neons yellow, blue, and orange, Sinful Colors San Francisco, and NYC Broadway Burgundy Frost. This is one of those manicures where I think it really looks much better in person than in pictures. I did manage to get a certain depth to it that I don't think really shows up here. Ah, well. Even if I didn't capture the effervescence of the painting, I still have pretty nails!


And, as I promised, the link to the great teacher of technique - Robin Moses teaching "Marbling Without Water":


Wednesday, August 8, 2012

Spiral Dotticure and a Nail Fail

As you may know from previous posts, my fellow hobbyists, I bought two of the twelve polishes in the new China Glaze On Safari Collection last month: Desert Sun and Call of the Wild. Once payday came, though, my friend V and I agreed that we needed the rest of the collection, so we split the cost half and half...and they arrived on my doorstep just a few days later! Aren't they gorgeous?


I'm sure you've all seen a metric ton of swatching posts on these polishes, so I won't bother to list off the names, but feel free to ask if you actually don't know which is which! :)

I of course wanted to do my next manicure using some of the new polishes...but honestly? I think I should have stopped part of the way through. It's a common failing of mine to not know when to *stop* when I'm doing a manicure. I've been making it a point to Pin things that show off how beautiful simplicity can be, so I'll remember it when I'm doing my own nail art. This weekend, however, I clearly forgot.


I started with a base color of China Glaze Man Hunt, which is quickly becoming my favorite blue (it pushed out my previous favorite, Frostbite, also a China Glaze.) The accent nails got a layer of Prey Tell added. I meant to do just Prey Tell on those nails, but I zoned out while painting on the pretty blue and forgot to leave those two nails plain. That was the first part of the fail - the Prey Tell just didn't look as gorgeous as it should have. Then I tried to do lace with a dotting tool...which came out pretty well, actually, though it probably would've looked better 1: in a straight line, rather than the curve I went with, and 2: if I'd STOPPED THERE. But I really wasn't happy with the way the Kalahari Kiss looked with the other two colors, though I should've. Mr. IJAH thought it was gorgeous at that point, actually. But...well...I added little flourishes in I'm Not Lion, and spread it thinly over the lace.


My 8-year-old daughter thought it was gorgeous. Me, not so much. I just couldn't like it, so I took it off. Let me know what you think, though - Hail or Fail?

Anyway, I'm very happy with what I replaced it with! Two coats of China Glaze Agent Lavender, and then dots in a swirl with two sizes of dotting tools, in Purr-fect Plum and Man Hunt, and this is the result:


The accent nail is kind of subtle - most of the nails have Purr-fect Plum on the tips and Man Hunt on the base of the nails, while my ring fingers have the colors reversed.


Monday, August 6, 2012

Where the Green Grass Grows...

I think my favorite manicure these days tend to be ones inspired by something other than nails. I've got a whole board on my Pinterest dedicated to Inspirations for Nail Art. I've also got separate boards for nail art itself, my own nail art (with links to here, so you can keep track of my pretties there or here, whichever is easier for you :), and nail polishes I want to own...though that last one really does tend to predominate to the browns and greens, since those are the polishes that catch my eye the most and make me go "Ooooh I WANT!" I try to actually buy a full spectrum of colors (thank you China Glaze for putting out collections that contain so many colors that I want - Capitol Colors and On Safari - that I give in and buy the whole thing!) but it's pretty much greens and browns that go on my wishlist.

I'm not sure if it's a good thing or a bad thing to write up blog posts when I'm hyper. I think the babble that comes out is more amusing than if I'm writing on a more calm day, but on the other hand, do you guys actually read these things or just look at the pretty pictures?? (Yes, co-worker N, I know you read them, but does anyone else, or am I just making myself giggle here? ;)

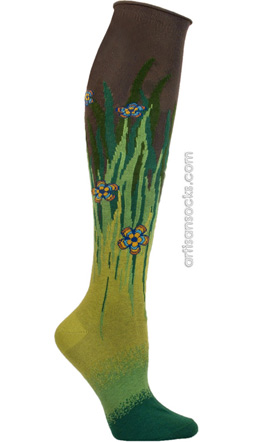
Aaaaanyway, on to what you're actually here for - you know, the nail art? :) As I was saying, I like the manicures I make based on something other than nails, in today's case, a pair of socks. Yes, a pair of socks! I don't actually own this particular pair (though I'd love to!) but I love weird and quirky socks, and so I enjoy perusing www.artisansocks.com for their aMAZing selection of socks! So, this is the pair I wanted to recreate on my nails:


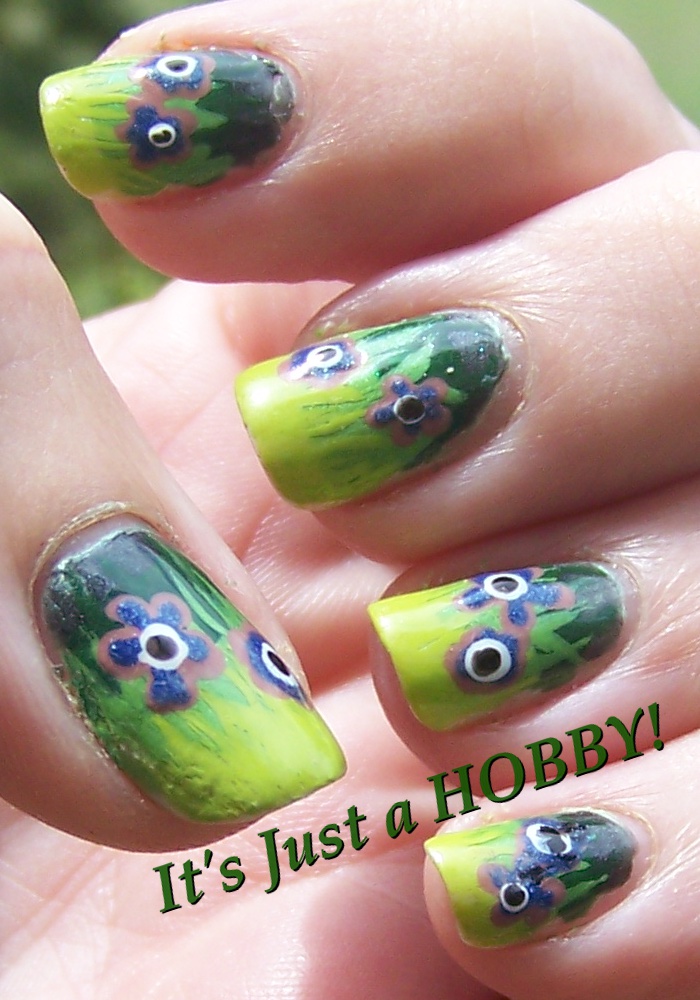
Aren't they adorable? Here's my, hopefully equally adorable, interpretation of them!


I started with a base of Color Trend Ice Sheers Refreshing Pair, which you can't really see in the final manicure, but it made the layering of the lightest green color just the right shade of yellow-green, since I didn't have exactly the right color in my polish paint palette. (I'm tempted to start calling it my Triple-P, but then I'd have to explain it each time I did, which sort of negates the purpose of the nickname... Heh. My brain is weird, have you noticed?)


Onward! I painted horizontal stripes of China Glaze Black Diamond for the grey top stripe, and Nubar Forest, and China Glaze Tree Hugger for the dark and medium greens. Then, starting with the dark green, I painted the taller grass upward into the color above it. Finally, I used Sinful Colors Innocent for the bottom light green grass, and lightly filled it in over the Refreshing Pear. I did try using Innocent as the base color on a test wheel first, but I preferred the color over Refreshing Pear rather than by itself. By itself, the blades of grass up over the Tree Hugger looked very different in shade than the bottom stripe, and it just looked wrong.


Then I used China Glaze Dress Me Up with a dotting tool to make the base color for the flowers, and layered on top of it Sinful Colors Neptune, then a single dot of Sinful Colors Snow Me White, and finally a small dot of NYC Black Lace Creme. I actually only did the flowers on my left (non-dominant) hand, and left my right hand with just the blades of grass. They were both cute! Of course, I was also developing a headache by the time I finished and decided it wasn't worth adding the flowers to the second hand...but really, I did like both versions! That's my story and I'm sticking to it...


Friday, August 3, 2012

Week 31: Crackle

Good morning fellow hobbyists! This week's theme on the Year's Challenge is crackle. I tried a bunch of designs out on my nail wheels before deciding on this one. I also realized that while I have two Wet N Wild crackles (Free, Free at Last and You're Too Good For Him), I don't actually like either one. They're pretty colors, but they just don't crackle wide enough to actually show the base color. Maybe I'm applying them wrong, but since I haven't had any trouble getting my new Avon Mosaics to crackle properly, and I've so far hated the application of every other Wet N Wild polish I've used, other than their glitter topcoats, I suspect it's just that I don't get along with WNW polishes in general. :P

On to today's manicure! I've decided to call this Cracked Lava, because at the right angle (which I had a hard time capturing on photo, drat it!), most of my nails really do look like lava flowing under cracked, blackened rock. I love it!


There are six layers of polish here, not counting base and top coats! I started with two coats of NYC Black Lace Creme, followed by three coats of Zoya Opal on my ring fingers, and three coats of Essie LuxEffects Shine of the Times on all the others. This was topped, of course, by a single coat of Avon Mosaic Effects in Black, applied on the diagonal. I think crackle looks best applied at an angle, because that allows it to look more random, more natural than crackle applied on a straight line, which tends to look just like cracked pavement that needs repair. :P


 I took waaay more pictures than strictly necessary of this manicure. I just love color shifting polishes, and I take pictures at every conceivable angle of light, trying to show off the variation! The pictures above were taken indoors, as it seemed to be the only lighting that wanted to show the -red- on film. The remainder of these were taken in the sunlight, which is my favorite lighting for nail pictures. I've taken to taking my camera to work the day after I do my nails, so I can take pictures outside on my lunch hour, rather than taking pictures inside the night I do them.


Wednesday, August 1, 2012

Gilded Chateau

Even the most enjoyable of a hobby becomes a pain from time to time. There are days when you know what? I really don't feel like doing my nails. But now everybody at work knows me for my nail art, I would feel...decidedly odd going to work with naked nails, or even a plain manicure. So this is what happens when you really don't feel like thinking much about your manicure. And yet, oddly enough, it frequently happens that I get more compliments on the designs I spent the least amount of time or thinking on.


I started with a base of Color Club Take Me to Your Chateau, and added two coats of BlackHeart Royally Screwed on my accent nails. I then drew little designs with a detail brush and Sally Hansen Gilded Pearl Chrome. I drew over the arcs and circles with Sinful Colors All About You, while leaving the side dots or swirls alone. It's a subtle difference that doesn't really show up well in the pictures, but I liked it.