I have a hard time with impulse purchases of nail polish this time of the year. I am all about the autumn colors - the vast majority of my wardrobe is black, green, and brown! Yellow pretty much only goes on my nails, but I have some burnt orange in there as well, and the isolated pieces of red, blue, pink, and white for accents, but autumn colors are my colors.
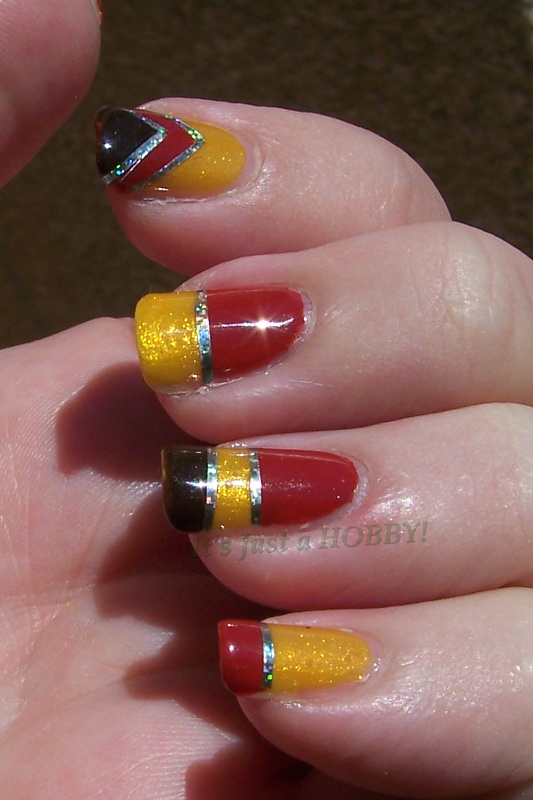
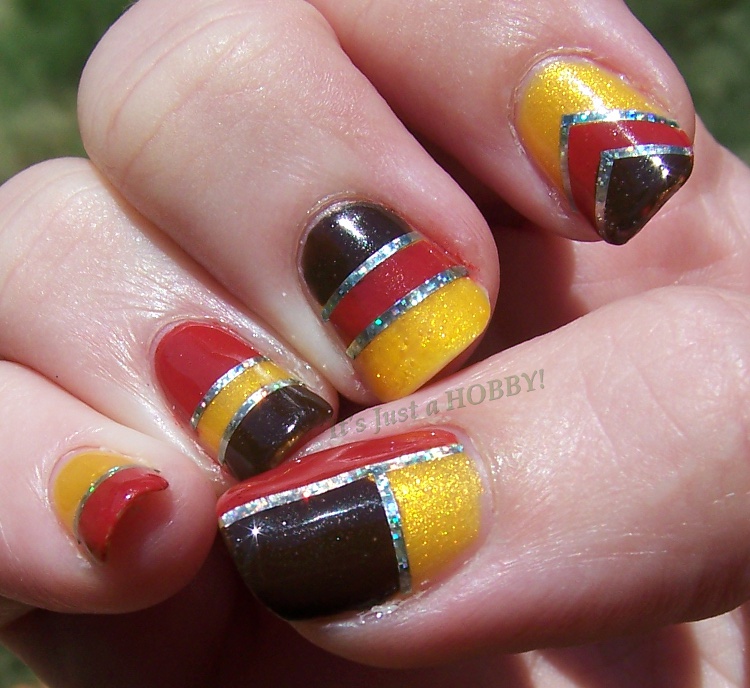
I was really excited about how well this manicure came out, because I adore crisp, clean, sharp lines in a manicure! I'm just usually not good at getting them myself! This color block is a Monkey See Monkey Do version of a manicure that I found on Pinterest posted from indulgy.com, but I always always always go searching for the original source of any picture I post, so this manicure is from Kate at Kate's Mani:
I used Sinful Colors for the entirety of this manicure: Let's Meet, Beau Brique, and Coffee (which is my new favorite brown and shows up in a LOT of the manis I've done the past few weeks!)
Detail oriented people might notice that I missed a stripe from the original on my middle finger. I noticed that, too, but didn't feel like fixing it, though I did add the third stripe on my second hand, because I thought it looked better that way.
And now for any other ladies who decided to Monkey See Monkey Do this Monday!
Welcome to my hobby. It's not an obsession, it's not an addiction, but it IS quite fun! I don't take it too seriously, and neither should you. ^_~
Showing posts with label striping tape. Show all posts
Monday, September 23, 2013
Thursday, July 18, 2013
July Tri-Polish #2 - taped mani
It's day two of July's episode of the Tri-Polish Challenge, brought to us by the wondermous Crumpet's Nail Tarts! This month's colors are blue, blue, and green, and my polishes are Pure Ice Home Run, China Glaze Man Hunt, and A-England Dragon.
I have long admired the crisp lines of a tape manicure, but I find the tape itself to be so fiddly that I seldom have the patience for it. But it pops up in my head frequently, and you can see how often it gets pinned to my Pinterest board. I finally made myself just sit down and do it. I love the results!!
There's really not much else to say about this manicure, so on with the pictures, and be sure to check out everybody else's Tri-Polish entries at the bottom of the post!
I have long admired the crisp lines of a tape manicure, but I find the tape itself to be so fiddly that I seldom have the patience for it. But it pops up in my head frequently, and you can see how often it gets pinned to my Pinterest board. I finally made myself just sit down and do it. I love the results!!
There's really not much else to say about this manicure, so on with the pictures, and be sure to check out everybody else's Tri-Polish entries at the bottom of the post!
Wednesday, May 1, 2013
Golden Rays and Lubu Heels
I came home the other day to a package in the mail. New polish! Woot! I love getting packages from my exchange group, and I love using new polishes in manicures! I received three Joe Fresh polishes (my first!) and three China Glazes, and the first one I put on my nails is my brand new China Glaze Lubu Heels. Soo pretty but so hard to photograph the rich red shimmer! You can expect to see all my new polishes over the next few weeks, as I don't put polishes into my polish shelf until after I've used them once. :)
On my thumbs and ring fingers I started with one coat of Sinful Colors Unicorn, topped by a coat of Sinful Colors This Is It. The rest of the fingers got two coats of Lubu Heels, and a coat of Seche Vite topped them all off. Then I used striping tape on the accent fingers and added a thick coat of Lubu Heels before removing the tape to reveal crisp gold rays. Some rhinestone accents in contrasting colors and it was ready to go.
Lubu Heels has been on my wishlist for a while now. I love the rich deep color. This is one of those manicures where I keep stopping what I'm doing and wiggling my fingers around just to look at the beautiful shimmer and sparkle on my nails!
On my thumbs and ring fingers I started with one coat of Sinful Colors Unicorn, topped by a coat of Sinful Colors This Is It. The rest of the fingers got two coats of Lubu Heels, and a coat of Seche Vite topped them all off. Then I used striping tape on the accent fingers and added a thick coat of Lubu Heels before removing the tape to reveal crisp gold rays. Some rhinestone accents in contrasting colors and it was ready to go.
Lubu Heels has been on my wishlist for a while now. I love the rich deep color. This is one of those manicures where I keep stopping what I'm doing and wiggling my fingers around just to look at the beautiful shimmer and sparkle on my nails!
Friday, March 29, 2013
52-Week Challenge: 3/25 - Stripes
I'm still plugging along on my appropriation of the 52-week challenge on reddit.lacqueristas. I don't read or post on reddit, because the format confuses the heck out of me, but I do browse it on occasion. And since they were the only place I could find a current weekly nail art challenge going, I grabbed their themes for the rest of the year.
This week's theme, as is obvious from the subject line, is stripes! I considered a variety of interpretations to use, but while browsing the pictures I have saved on my Nail Art board on Pinterest, I chose a manicure that I cannot for the life of me FIND now in order to give credit where it's due! If you recognize this design (the original had a much smoother curve where the colors began, and it was in blue) please let me know where I got it, so I can credit their design.
I originally wanted to do this in purple, but turns out my purple spectrum is a little lacking - trying to get a light to dark range of five colors was impossible because some of them were too red and some too blue to look right. So I decided to go with green, instead, since green and brown are the LARGEST color selections in my stash! ^_^
I started with a base color of China Glaze Re-Fresh Mint, and after taping off the correct sections, I added Sinful Colors Mint Apple, NYC Big Money Frost, Nubar Reclaim, and finally Sinful Colors San Francisco. I haven't been able to get pictures outside in the sunshine lately, but the real color on this is somewhere in between these two pictures:
I'm pretty happy with the way they came out, even if they aren't your stereotypical stripes.
This week's theme, as is obvious from the subject line, is stripes! I considered a variety of interpretations to use, but while browsing the pictures I have saved on my Nail Art board on Pinterest, I chose a manicure that I cannot for the life of me FIND now in order to give credit where it's due! If you recognize this design (the original had a much smoother curve where the colors began, and it was in blue) please let me know where I got it, so I can credit their design.
I started with a base color of China Glaze Re-Fresh Mint, and after taping off the correct sections, I added Sinful Colors Mint Apple, NYC Big Money Frost, Nubar Reclaim, and finally Sinful Colors San Francisco. I haven't been able to get pictures outside in the sunshine lately, but the real color on this is somewhere in between these two pictures:
I'm pretty happy with the way they came out, even if they aren't your stereotypical stripes.
Saturday, February 16, 2013
Reciprocal Gradient
This manicure was inspired by the gorgeousness of this manicure by Sweet Sugar. I failed in not using colors with enough contrast, though. It came out as a pretty manicure, but very, very subtle. I used Sinful Colors Neptune and OPI Live and Let Die, sponged a gradient one way, added striping tape, and then sponged the same gradient the opposite way. Definitely not enough contrast, though. I tried to pick pictures that showed the color variation the best...
I really liked the sparkle and I actually enjoyed the subtleness of the color gradient, but I'll admit it got a bit annoying to have to actually point out the "nail art" part of the manicure to my co-workers. :P Everybody thought it was pretty even before they asked what I "did to it", though. :)
Picture spam if you want to see more...
I really liked the sparkle and I actually enjoyed the subtleness of the color gradient, but I'll admit it got a bit annoying to have to actually point out the "nail art" part of the manicure to my co-workers. :P Everybody thought it was pretty even before they asked what I "did to it", though. :)
Picture spam if you want to see more...
Thursday, February 16, 2012
Wacky Wednesdays!
At one point, I'm sure that I said I was going to do nail art on my fingers ONCE a WEEK. However, for the last three weeks, my nails have decided to stage a rebellion on Wednesday night. One week I broke the tip of one of my nails, and about half the polish came up with it. The next week a couple-millimeter sized piece of my thumbnail decided to get flaky. This week half the polish on my pinky finger decided to chip off (and I didn't bang it or anything, I just looked down and it wasn't there.)
So apparently my nails have decided that I must have a new manicure twice a week instead of just once. I still contend this is just a hobby. Pay no attention to the amount of time I spend on the web looking at things that pertain to nail polish...
I have created a successful tape mani! Woo, and I say, hoo! Even following all the tips and tricks found all over the blogosphere, however, still resulted in having to redo one of my nails when the base polish peeled up with the tape. Only one out of ten, though, and I consider that a success! :)
The base colour on this week's pretties is China Glaze Tree Hugger. Using tape to mark off the triangles, I painted them with NYC Big Money Frost, and sprinkled some pretty green glitter on it. Then I added some bling, and two layers of topcoat later, I have pretty hands! I probably would have been fine with one layer of top coat, but for some reason loose glitter leaves me more paranoid than glitter in a polish. I'm always left thinking that even a light touch will brush it up off!
I thought I was pretty messy with it, given how I had a dusting of green sparklies all over my pants when I was done, but I didn't realize just how much glitter got everywhere until I was getting ready for work this morning. Glancing in the mirror while brushing my hair, I spotted a few pieces of stray glitter on my face. And then when I went to wipe them off with a damp washrag? Tilting my face just right showed another...and another...until I'd spent a ridiculous amount of time looking absurd, tilting my face this way and that way, because that darned glitter was completely invisible until the light hit it just right! It's a good thing I'm easily amused, so I was giggly instead of annoyed at it. ^_^
I took these pictures last night after I finished my manicure - I decided to go ahead and post the second one even though it's a little blurry because it shows the glitter sparkle so nicely.
And since it was supposed to be sunny today, I took my camera with me to work to see if I could catch some pictures in better lighting. I'm still learning the techniques needed to take pictures of my nails, though (not the least of which is my hand doesn't naturally curl that way! grrrrr) so forgive me if they're not the greatest.
I'll have another file drawer post up in a day or two, and then this weekend's 52-Week Challenge theme is CORSETS! Again with the woo and hooing! :)
So apparently my nails have decided that I must have a new manicure twice a week instead of just once. I still contend this is just a hobby. Pay no attention to the amount of time I spend on the web looking at things that pertain to nail polish...
I have created a successful tape mani! Woo, and I say, hoo! Even following all the tips and tricks found all over the blogosphere, however, still resulted in having to redo one of my nails when the base polish peeled up with the tape. Only one out of ten, though, and I consider that a success! :)
The base colour on this week's pretties is China Glaze Tree Hugger. Using tape to mark off the triangles, I painted them with NYC Big Money Frost, and sprinkled some pretty green glitter on it. Then I added some bling, and two layers of topcoat later, I have pretty hands! I probably would have been fine with one layer of top coat, but for some reason loose glitter leaves me more paranoid than glitter in a polish. I'm always left thinking that even a light touch will brush it up off!
I thought I was pretty messy with it, given how I had a dusting of green sparklies all over my pants when I was done, but I didn't realize just how much glitter got everywhere until I was getting ready for work this morning. Glancing in the mirror while brushing my hair, I spotted a few pieces of stray glitter on my face. And then when I went to wipe them off with a damp washrag? Tilting my face just right showed another...and another...until I'd spent a ridiculous amount of time looking absurd, tilting my face this way and that way, because that darned glitter was completely invisible until the light hit it just right! It's a good thing I'm easily amused, so I was giggly instead of annoyed at it. ^_^
I took these pictures last night after I finished my manicure - I decided to go ahead and post the second one even though it's a little blurry because it shows the glitter sparkle so nicely.
And since it was supposed to be sunny today, I took my camera with me to work to see if I could catch some pictures in better lighting. I'm still learning the techniques needed to take pictures of my nails, though (not the least of which is my hand doesn't naturally curl that way! grrrrr) so forgive me if they're not the greatest.
I'll have another file drawer post up in a day or two, and then this weekend's 52-Week Challenge theme is CORSETS! Again with the woo and hooing! :)
Subscribe to:
Posts (Atom)